SAP ERP HR Agent
SAPAgent is the DirX Identity agent that handles the export of SAP ERP Human Resources (HR) Personnel Administration (PA) entries from a SAP ERP database for import into the meta directory store. Arbitrary objects of the Organizational Management (OM) component can also be exported.
SAPAgent is implemented as an ERP application (in ABAP) that can be executed in the SAP GUI.
SAPAgent Unicode supports ERP 6.0 HCM (Human Capital Management) and higher and runs on all SAP NetWeaver server (ABAP stack) platforms. It is not important whether the system is configured for Unicode or not.
SAPAgent can:
-
Create one or more SAPAgent transfer configurations; a SAPAgent configuration describes a full or delta export of selected SAP ERP Personnel table entries or selected SAP ERP OM objects
-
Allows detailed multiple selection of objects and employees by using the SAP standard ‘logical databases’ PCH’s and PNP’s selection screens
-
Include records about new employees or modifications for specific time periods into the future in a full or delta export
-
Be enhanced with customer exits for attribute computation or for the exclusion of persons or OM objects
-
Transport SAPAgent configurations to a production system for subsequent activation and scheduling
-
Schedule SAPAgent configurations for immediate execution or for execution via the ERP job scheduler
-
Generate log files of SAPAgent operations and any errors that occur
SAP ERP differentiates between customization, test and production phases. These phases are generally dedicated to separate ERP systems. Consequently, working with SAPAgent consists of the following phases:
-
Customizing, usually performed on an ERP development system using the ERP Implementation Guide (IMG)
-
Customizing transport to the production system
-
Activation on the production system
-
Background (or manual) execution through the ERP job scheduler
The following figure illustrates the SAPAgent components.

This section describes:
-
SAPAgent installation
-
SAPAgent predefined roles
-
SAPAgent command format
-
SAPAgent transfer configuration
-
Transport of SAPAgent configurations from customizing to production
-
Configuration activation and immediate (ad-hoc) execution
-
SAPAgent job scheduling
-
The SAPAgent export procedures, security features, and customer exits
-
The export data file formats that SAPAgent generates
-
SAPAgent logging
SAPAgent provides a base configuration with a set of default values; see the sections "Configuration" and "Default Configuration" for an explanation of the base configuration and the default configuration values.
SAP ERP HR Agent Prerequisites
Before you can use the SAP ERP HR agent, you must extend the DirX Identity Store schema with SAP ERP HR target system-specific attributes and object classes so that the agent can store SAP ERP HR-specific information in the Identity Store. For instructions, see the section "Extending the Schema for the Target System Workflows" in the DirX Identity Application Development Guide.
Installing the SAP ERP HR Agent
This section describes how to install the SAP ERP HR agent (SAPAgent). It provides hints for the integration of test and production systems and a checklist for SAPAgent installation. The installation procedure uses the SAP ERP transport system, so you should be familiar with this component.
SAPAgent Installation Checklist
This checklist consists of three sections:
-
Preparing the installation (before importing the application files) - describes how to prepare your system environment before running the actual installation.
-
Importing the application files - describes how to install the application files into your ERP system.
-
Completing the installation (after importing the application files) - describes how to complete the installation after the application files have been installed on the target ERP system. After this step, the application is ready for use on the target system. Once you have familiarized yourself with the application, you can use the /sie/dirx_ag transaction code to customize the application to your requirements.
Preparing the Installation (before Importing the Application Files)
Installing SAPAgent is a straightforward process and follows the rules set by SAP for the installation of ERP third party products.
Checking the ERP System
The ERP system in which the application is to be installed must have a release level of 6.0 or higher. The installation procedure assumes that the clients 000 and 001 are at least similar to the configuration that is delivered by SAP. The installation procedure also assumes that the Human Resources (HR) component in the client into which the application is to be installed is configured according to your needs.
Checking the Name Space
To prevent conflicts with other applications, you must check to make sure that the name space required by SAPAgent (/sie/dirx…) is not already in use. This should not normally be the case, because the name space is reserved for this application.
Use the repository browser to check the namespace in the ABAP workbench. If the name space contains objects, do not proceed with the installation until you have determined the source and purpose of these objects.
| The installation creates an authorization class "YSDX". Check to make sure that it is not already in use. If it is, do not proceed with the installation, and contact your supplier. |
Backing up the System
Before you import the application into the system, you should perform a backup of the full system so that you can restore the information in the event that problems occur during the installation.
Importing the Application Files
In order to import the SAPAgent, you must be familiar with the SAP transport management system (TMS) component.
Copy the files from the installation media to the subdirectories trans\data and trans\cofiles in the transport directory of the ERP system. Ensure that the copied subdirectories and files are read- and write-enabled for the SAP user (files copied from CD-ROM or DVD are usually read-only).
The transport consists of objects of the following categories:
-
Workbench (consisting of a K… and an R… file)
-
Customizing (consisting of a K… and an R… file)
Import Workbench
The Workbench import transports are indispensable for the installation and include the program logic and data structures.
Import Customizing
The Customizing import transports are only required for a new installation. If customizing has already been performed, you should omit this step.
| Importing the customizing transport deletes all previously created configurations. |
Executing the Import
The imports must be performed in the following sequence:
-
Workbench imports
-
Customizing imports
Note: The workbench import must be performed once for a system. The customizing import must be performed for the actual client or clients that use the agent.
To import each of the transports:
-
Log in to the ERP system as administrator.
-
Start the transport management system (Transaction STMS).
-
Change to the import queue overview (Menu Overview – Imports (or F5)).
-
Select an import queue (double-click).
-
Change to import insertion (Menu Extras – Other requests – Add)
-
In the pop-up panel, enter the name of the transport to be added. This name is derived from the K… filename by the extension suffixed by the filename without the extension (e.g., the file K900124.D13 indicates transport D13K900124).
-
Select Yes in the pop-up Add transport request.
-
The new request should now appear in the list of the requests of the import queue. Select it.
-
Start the import (Menu Request – Import (or Ctrl F11)).
-
In the pop-up Import Transport Request, specify the client into which the transport is to be imported; in the Options tab, select the two Overwrite… options. Verify that the import type is synchronous, then click OK.
-
In the pop-up Start Import, click Yes.
After the transport has been imported, check the result code. Depending on the environment, a return code of 0 or 4 is okay. Other return codes (e.g., 8 or 12) indicate severe problems – the installation is not successful.
Finishing the Installation (after Importing the Application Files)
While performing the following procedures, the system asks you for a transport request; you can use transaction SE10 to generate one.
Maintaining Users
It is recommended that you create new users for the maintenance and execution of SAPAgent and that you maintain these users with the necessary authorizations. The user selected for SAPAgent execution also must be authorized to read the HR master data, to write into the file system of the application server and to execute external applications on the application server (if enabled during customization).
In order to simplify this process two pre-defined roles are included in the customizing data of the SAPAgent. See below for more information about roles.
| Your authorization may not be sufficient to maintain the SAPAgent tables. In this case, consult the chapter ‘management of authorizations’ in the ‘IMG’ manual. |
Checking the Installation
-
From the menu, select Tools-→ ABAP Workbench -→ Repository Browser.
-
Select /sie/dirx_ag in the "development class" field.
A list of several items should appear.
Testing the Installation
Select the transaction code /sie/dirx_ag. (You can include the transaction code /sie/dirx_ag into your start menu by selecting System → User profile → Own data → Profiles.
Test some menu entries.
The installation procedure installs the standard configurations "sample configuration 1 (PA)" and "sample configuration 2 (OM)", which do not require any customizing.
Upgrading Existing Configurations
At the initial start of an upgraded release of the agent, existing configurations must be updated to the new release 5 format which is based on the LDBs ("Logical DataBase") for PA and OM.
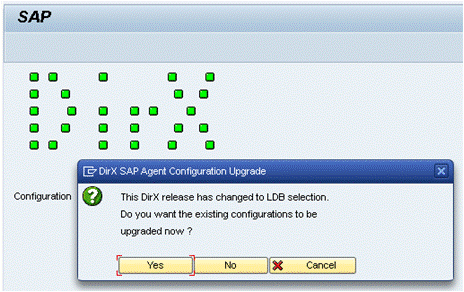
The upgrade can be made at any time, the release 5 agent terminates if the upgrade is not yet executed (Button No or Cancel).
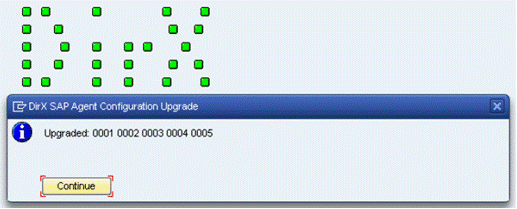
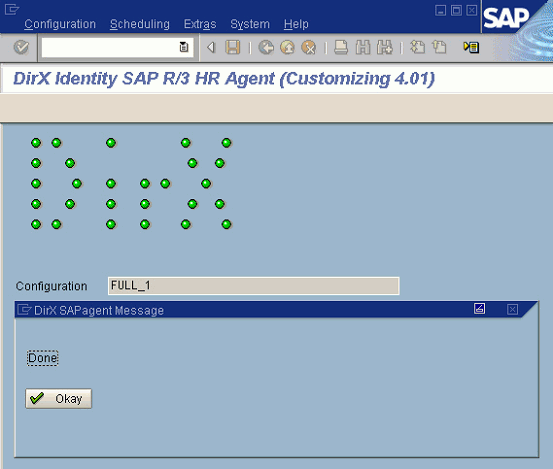
After an upgrade has been performed (by choosing Yes) all existing configurations (including the sample configurations) are upgraded to LDB-based selection parameters. A list of upgraded configuration Ids is shown:
The SAPAgent is now ready to be used on the development system. The next section explains how to transport the customizing from the development system to a test system or the production system.
Initializing the Application
-
Run Scheduling → Synchronize DirX Conf’s to ERP Jobs. This action inserts or modifies a job into the ERP job management for every configuration.
Hints for Integrating Test and Production Systems
You need to create a "customizing order" to be able to bring ("transport") your customizing information from the development system to the test system and to the production system. From time to time during customizing, the system will prompt you to enter (or select) this order.
To install the customized application on your test system:
-
Release and export the customizing order on the development system
-
Import the application files from the installation media to the test system
-
Import the customizing order from the development system to the test system
Follow the same procedure to install the customized application on the production system.
Transferring SAPAgent Configurations to another ERP System
The SAPAgent must be installed (use the installation procedure just described) on the target system
-
On the source system, start the application and select Extras → Transport Customizing. If a transport request has not already been specified, the system prompts for one. Next, execute the process to fill the transport.
-
Release the transport (SE10); this action automatically exports the files to the operating system.
-
Copy the files to the target system.
-
Import the files (using tp or STMS)
-
Open Scheduling → Synchronize DirX Conf’s to ERP Jobs and run Execute synchronization. Check this item and uncheck others then click on execute (F8). This action inserts or modifies a job into the ERP job management for every configuration.
The target system is now ready to use. You can check the application’s log file or the ERP Job management (SM37) to verify that the configuration is correct.
Upgrading the Installation
New SAPAgent versions can generally be installed over existing versions. See the ReadMe of the new version for further details.
In most cases, only the workbench transport must be installed (this transport includes the program and data dictionary definitions). The customizing transport contains the default configurations.
| If you install the customizing transport again, any previous configurations are lost. |
In version 5 the internal format of configurations has changed. At the first start of the new agent a dialog offers to migrate existing configurations.
Predefined Roles
The customizing data of the agent provides the following two pre-defined roles that contain the necessary authorizations for a batch and an administrator role:
-
Batch role
The role /SIE/DIRX_HR_AGENT_BATCH contains authorizations for a system user (user type ‘system’) under which a background job can be scheduled. -
Administrator role
An administrator who configures and executes the SAPAgent requires the role /SIE/DIRX_HR_AGENT_ADMIN.
Roles are assigned to users in the SAP user administration (transaction SU01).
Command Format
SAPAgent is an ERP application that is integrated into the SAP GUI as a graphical user interface. To run SAPAgent:
-
Log on to the ERP server (It is recommended that you select English (EN) as the dialog language.)
-
In the ERP SAP GUI browser command line, type the transaction code /sie/dirx_ag (or /n/sie/dirx_ag), and then press Enter.
SAPAgent runs and displays its main window.
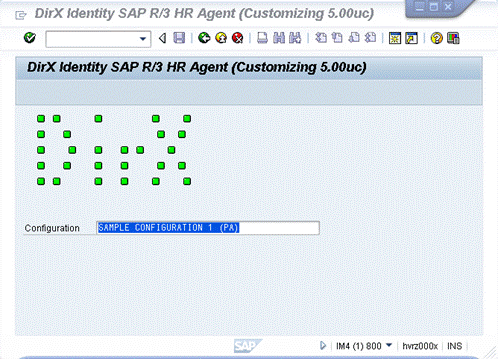
The title bar indicates the version of the agent and whether SAPAgent is running on a customizing or a production client. The name suffix "uc" indicates Unicode enabled releases. In general, you run SAPAgent on a customizing client to configure a transfer and transport it to the production client. You run SAPAgent on a production client to activate the transfer for ERP job scheduler execution (or for immediate execution without ERP scheduling).
To exit SAPAgent, click the back icon or press function key F3.
Configuration
Each SAPAgent transfer is described by a configuration. SAPAgent can manage multiple configurations. A configuration can be active (entered into the ERP job scheduler) or inactive.
The SAPAgent installation procedure creates two base (default) configurations (PA and OM). New configurations are inherited from one of these base configurations. The base configurations cannot be deleted. SAPAgent allows you to select a configuration out of a list of available configurations. All changes are then applied to this configuration. To select a configuration in the SAPAgent main window, use the selection button or press F4.
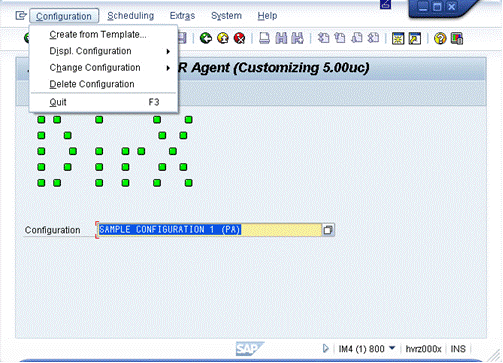
Use the Configuration menu selection in the main SAPAgent window to:
-
Create a new configuration from a template configuration
-
Display, edit and delete configurations
-
Quit the agent
To create a new configuration from a template configuration:
-
Select an existing configuration or use the base configuration.
-
From the Configuration menu, select Create from Template. The New Configuration dialog box appears.

-
In New Configuration, enter the name of the new configuration, and then click OK. SAPAgent copies the existing configuration into the new configuration.
You use the Change Configuration menu selection to select the Human Resources data to be applied to the configuration. You select this data in two dimensions:
-
Selection of persons or OM objects, called vertical selection
-
Selection of person attributes or OM objects attributes, called horizontal selection
You also use the Change Configuration menu selection to define a job for a configuration.
This section also describes:
-
Changing the Configuration
-
The default configuration
-
Transport from customizing to production
-
Configuration activation and immediate (ad-hoc) execution
Vertical Selection (PA)
You use the SAPAgent vertical selection dialog to determine the persons that are to be exported from the SAP/ERP database. To display the vertical selection dialog:
-
Click Configuration.
-
Select Change Configuration, and then select Attributes for PA.
SAPAgent displays the vertical selection dialog. The dialog box contains four areas for vertical selection:
-
Multiple Selection including Period and Selection - this section enables you to specify selection criteria which the agent then uses to determine which set of data is read. These selection "screens" are the standard SAP report selection screens used in HR management. It contains a series of selection fields and buttons which are described in the SAP manuals. For further information see
http://help.sap.com/erp2005_ehp_06/helpdata/EN/e5/7c3438fd263402e10000009b38f8cf/frameset.htm
The Selection part enables you to enter a single value or value range for each selection field, which you can then restrict still further using the selection options.
Multiple selection also enables you to enter-
Several single values or value ranges to be taken into account when the export is executed.
-
Several single values or value ranges to be excluded when the export is executed.
You can also use a selection option for each value and range; for example, greater or less than a single value, and within or not within a range.
-
-
Other attributes - defines the type of export to be performed (full or delta) and defines export data file format.
-
Job - a job definition provides information about the configuration for the ERP job scheduler. You use the Job area of the vertical selection dialog box to define a job.
The Multiple Selection Area
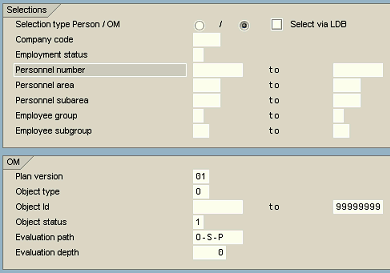
The following figure shows the Selections area of the vertical selections dialog box.
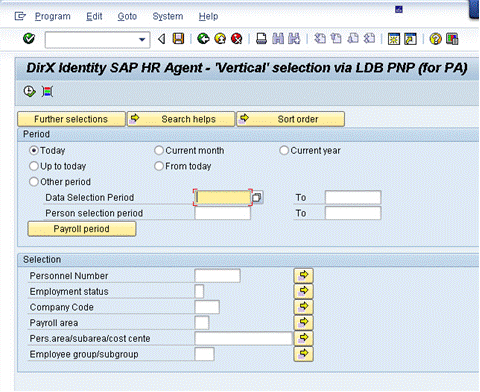
Each selection criteria field is displayed on a separate line. Click in any selection criteria field (or press F4) to display a list of the entries that are allowed for the field.
Click on the Further selections button to add more selection criteria. The Personnel number field is a mandatory selection field, and you must always supply a range. Selection criteria fields that have no values entered in the lower portion of a range are not used for limiting the selection.
| In the Period section only Today is valid. Other date or range selections are undefined. |
| Fields with a zero value are left blank; this is an ERP issue. |
The Other Attributes Area
The following figure shows the Other attributes area of the vertical selections dialog.
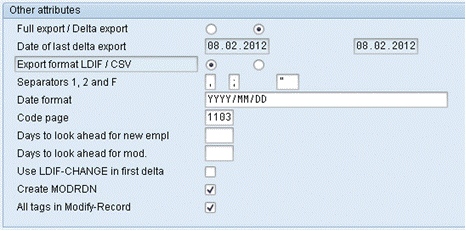
The next sections describe the fields of the Other attributes area.
- Full Export / Delta Export
-
This field selects whether the configuration is a full export or a delta export of SAP/ERP person entries. Selecting this field marks the configuration for exporting all data within the vertical selection regardless of the type of export performed in the last export.
If you do not select this field, the configuration is a delta export. A delta export only selects the data that has changed since the last export. The first export after the creation or change of a configuration is always a full export.
This is a mandatory field for a full export.
- Date of Last Delta Export
-
This field is an informational field that displays the date of the last and first delta export, or the last and first full export. SAPAgent automatically generates this field. Entering a different date into this field overwrites the internal date so that you can generate a delta export for a longer or shorter time period. Do not enter a date that is prior to the date of the first delta export for the configuration.
- Export Format LDIF / CSV
-
This field selects the export data file format. The possible selections are:
-
LDIF-Selects LDAP Data Interchange Format (LDIF) file format. Use this format for full exports or delta exports.
-
CSV-Selects Character Separated Value (CSV) format. Use this format for full exports only.
This is a mandatory field.
-
- Separators 1, 2 and F
-
These fields specify the separators and the field delimiter character where
-
Separator 1 - specifies the separator character between entries (fields) in the export data file.
-
Separator 2 - specifies the separator character between multiple values within one field (entry).
-
Separator F - specifies the field delimiter character. Usually the double-quote character (") is used as field delimiter. Escape the field delimiter by a consecutive delimiter character if it is embedded in the field value.
These are mandatory fields if the Export Format selected is CSV.
-
- Date Format
-
This field specifies the format in which date values are to be represented in the export data file. The standard format is:
DDD, DD.MMM.YYYY
for example:
MON, 26.JUN.2011You can also use a two-digit representation for the month; for example:
MON, 26.06.2011This is an optional field.
- Code Page
-
This field selects a code page (the number assigned to a character code set) into which the characters of the export are to be converted. If this field is not specified, SAPAgent uses the standard code page (1103) for the configuration. Select code page 1133 to use the ISO-8859-1 character code set.
SAPAgent (Unicode) does not support code pages because SAP does not support code pages in Unicode systems. The created file is in UTF-8 format. The Meta Controller must be configured to import UTF-8 files.
- Days to look ahead for new empl/obj
-
This field specifies the number of days that the SAPAgent looks into the future for new persons or new objects. You can use this field to extend the set of selected persons and the set of extracted person data that will be exported as new employees join the company. Since all HR data is marked with a begin date and an end date of validation, or additions can be made that will become valid in the future. You can use this feature to synchronize data of new employees into other directories, for example, to create an e-mail address, before the new employee begins work.
OM export: When set, the implementation aligns the key date of the export by the amount of days specified.
This field works with both full and delta configurations and is an optional field.
- Days to look ahead for mod./mod.obj
-
This field specifies the number of days that the SAPAgent looks into the future for modifications of persons or objects. You can use this field to extend the set of extracted person data that will be exported. Since all HR data is marked with a begin date and an end date of validation, updates can be made that will become valid in the future. You can use this feature to synchronize updated data in a future time period into other directories.
You might get several records in the export file for the same person in a strict order (actual additions, modifications followed by future additions or modifications). Therefore it is advisable to export the begin date and end date attributes of the relevant infotypes. Unless you use “LDIF-CHANGE in first delta” you can get a mixture of LDIF-CONTENT and LDIF-CHANGE format in the first delta export.
This field works with both full and delta configurations and is an optional field.
- Use LDIF-CHANGE in first delta
-
This field specifies whether LDIF-CHANGE or LDIF-CONTENT format is used for the first delta export that is always a full export. By default, LDIF-CONTENT format is written.
This is an optional field.
- Create MODRDN
-
This field specifies whether changes of attributes in the pseudo-dn are exported using a modrdn changetype record. In earlier versions (before 2.0x) this was exported as a modify changetype record.
Example: Change of surname from Meyer to Mueller:
dn: GN=Anja, PNO=00001000, SN=Meyer
changetype: modrdn
newrdn: SN=Mueller
deleteoldrdn: 1
Because this feature changes the output format of the export files, you must adapt your meta controller import scripts if you are upgrading from a earlier version. This field works with delta configurations and is an optional field.
- All tags in Modify-Record
-
This field specifies whether in delta mode a new formatting style is used. The new formatting style lists all attributes as a tagged list. If this field is set any modify and any add record contains next to the pseudo-generated DN all non-empty attributes in a tagged list. A pseudo attribute "CHANGETYPE" is also part of the list. A delete record will only consist of the pseudo-generated DN and the CHANGETYPE: DELETE attribute. If the "Create MODRDN" field is set also this format will still include the CHANGETYPE: MORRDN record as it does with the default LDIF change format.
The difference to the default LDIF change format is that in a modify record all attributes are exported, not just the changed attributes. This format is helpful if the following step of processing the agent’s export file fails to modify all changed attributes in the target directory, so that attributes must be changed in the ERP database again and a second export is necessary. With the default format this second export would just have the attributes that have changed in-between.
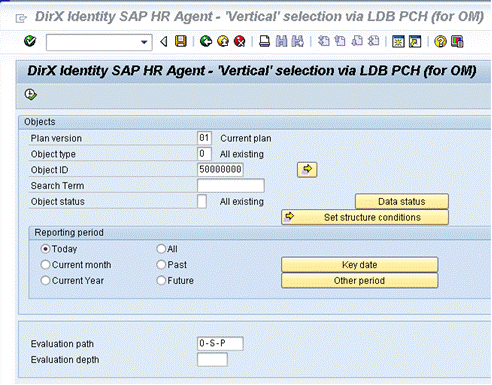
Vertical Selection (OM)
You use the SAPAgent vertical selection dialog to determine the OM objects that are to be exported from the SAP/ERP database. To display the vertical selection dialog:
-
Click Configuration.
-
Select Change Configuration, and then select Attributes for OM.
SAPAgent displays the vertical selection dialog. The dialog box contains five areas for vertical selection:
-
Multiple Selection including Objects and Reporting period - this section enables you to specify selection criteria which the agent then uses to determine which set of data is read. These selection "screens" are the standard SAP report selection screens used in HR management. It contains a series of selection fields and buttons which are described in the SAP manuals. For further information see
http://help.sap.com/erp2005_ehp_06/helpdata/EN/e5/7c3438fd263402e10000009b38f8cf/frameset.htm
The Selection part enables you to enter a single value or value range for each selection field, which you can then restrict still further using the selection options.
Multiple selection also enables you to enter-
Several single values or value ranges to be taken into account when the export is executed.
-
Several single values or value ranges to be excluded when the export is executed.
You can also use a selection option for each value and range; for example, greater or less than a single value, and within or not within a range.
-
-
Evaluation path - This field and the evaluation depth field are optional. These fields can be used in combination with the multiple selection. If an evaluation path is given the path is additionally followed for each object from the multiple selection area. This was the only possible way in former versions of the SAPagent.
-
Configuration - a read-only field that displays the configuration name.
-
Other Attributes - defines the type of export to be performed (full or delta) and defines export data file format. (See also "Vertical Selection (PA)" for details.)
-
Job - a job definition provides information about the configuration for the ERP job scheduler. You use the Job area of the vertical selection dialog box to define a job.
Each selection criteria field is displayed on a separate line. Click in any selection criteria field (or press F4) to display a list of the entries that are allowed for the field.
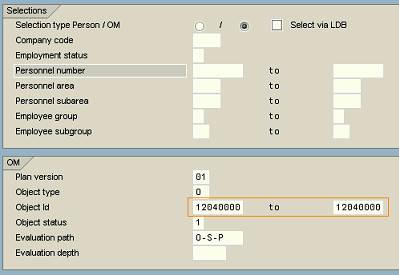
Selection via LDB
The Objects and Reporting period sections enables you to specify selection criteria which the agent then uses to determine which set of OM data is read. These selection “screens” are the standard SAP report selection screens used in HR management. It contains a series of selection fields and buttons which are described in the SAP manuals. For further information see
Plan version, Object type and at least one Object Id are mandatory fields. The object Id is used as a starting point. Object type defines what kind of OM objects are to be exported.
The Evaluation path field is an optional selection field and is used to navigate to the result set of the objects. You can only use evaluation paths that are defined in the ERP system. If you cannot find a suitable evaluation path, you must use the ERP system to define a new path. You can set an evaluation depth. The agent evaluates the objects to export along an evaluation path. With setting the depth you can reduce the number of evaluated objects. For example, the path O-O recursively describes the predecessor organizational unit. If you are interest just in the superior unit set the evaluation depth to 2.
Selection criteria fields that have no values entered in the lower portion of a range are not used for limiting the selection.
| In the Reporting period section only Today is valid. Other date or range selections are undefined. |
| Fields with a zero value are left blank; this is an ERP issue. |
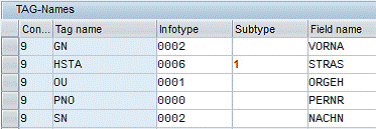
Horizontal (Attribute) Selection
You use the SAPAgent horizontal selection function to determine the person attributes that are to be exported from the SAP/ERP database. To display the horizontal selection dialog:
-
Click Configuration.
-
Select Change Configuration, and then select Tags (Fields).
SAPAgent displays the horizontal selection dialog.
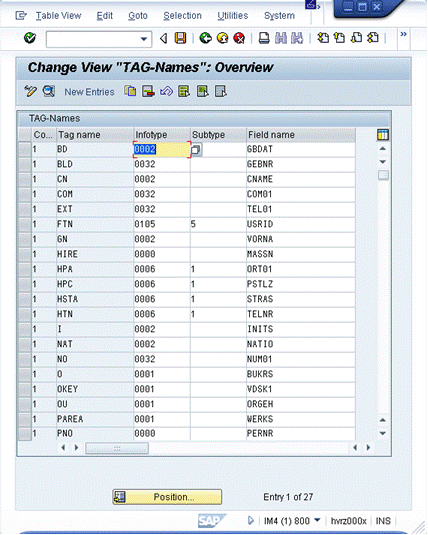
The dialog consists of the following columns:
| Configuration | Configuration ID. The unique identifier for the configuration. This is a mandatory field. |
|---|---|
TAG name |
The abbreviation for the attribute (tag); for example, GN. This is a mandatory field. Tag names cannot be longer than 30 characters |
Infotype |
The infotype for the attribute. This is a mandatory field. |
Subtype |
The subtype for the infotype. This is an optional field unless subtypes have been defined for the infotype. |
Field name |
The field per infotype (sub-table). This is a mandatory field. |
Each entry (row) shown in the dialog represents an attribute name and the data associated with the attribute. An entry must have at least an infotype (Infotype) value and a field of that infotype (Field name).
Use the ERP data dictionary (transaction code SE11) to obtain the infotype, the subtype (if applicable), and the field name for an entry. The information about HR infotypes is located in tables PAnnnn, where nnnn represents the infotype. The information about OM infotypes is located in tables HRPnnnn.
| Be careful when defining the tags. In delta mode, only entries are exported if any values of the selected tags have changed. For example if you want to export entries into a company you must at least export from infotype 0000 the fields pernr, subtyp, and begda. |
| If the subtype field is empty it is not evaluated by the SAPagent, all subtypes are exported. If you want to explicit filter the empty subtype (subtype 0) you must specify the characters as a mark for the empty one. |
To insert a new entry, use the New Entries button or copy an entry and then edit it. When inserting new entries with the New Entries button (F5). Copying or the New Entries button opens the details view dialog screen.
To delete an entry, select it and then click the Delete button (Shift+F2).
To edit an entry or view it in detail, double-click it.
The Change Tags Overview dialog only shows the most important configuration parameters. The detail view provides more detailed information.
To edit or view an entry in detail view:
-
Select the entry’s TAG column, then click the magnifying glass icon in the application toolbar or double-click the selected entry. The Details dialog appears.
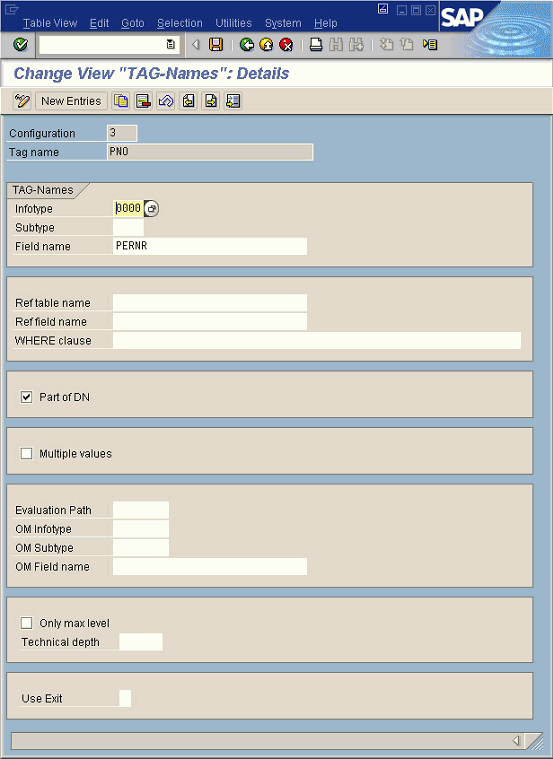
The dialog box provides the following fields:
| Configuration | Configuration ID. The unique identifier for the configuration. For new entries this is a mandatory field you must edit. For existing entries this is just an informational field. |
|---|---|
TAG name |
The abbreviation for the attribute (tag); for example, GN. For new entries this is a mandatory field you have to edit. For existing entries this is just an informational field. |
Infotype |
The infotype for the attribute. This is a mandatory field. |
Subtype |
The subtype for the infotype. This is an optional field unless subtypes have been defined for the infotype. |
Field name |
The field per infotype (sub-table). This is a mandatory field. |
Ref table name |
The name of a reference table. This is an optional field. |
Ref Field name |
The name of a reference field in the reference table. This is an optional field. |
WHERE clause |
A SQL expression that specifies the value of the entry, if the values in Ref table name and Ref field name are insufficient to describe the value. This is an optional field. |
Part of DN |
Whether or not the attribute is part of the generated distinguished name (DN) = key. This is an optional field. |
Multiple values |
Whether or not the attribute is a multi-valued field (relevant only for OM objects). This is an optional field. |
Evaluation Path |
The evaluation path to a related object, starting from the selected OM object or person. If this column is used, the Infotype, Subtype and Field name (in the box named TAG-Names) must identify the starting object (that is, the object id or the personnel number). This is an optional field. |
OM Infotype |
The infotype for the attribute of the related object. This is an optional field. |
OM Subtype |
The subtype for the infotype. This is an optional field unless subtypes have been defined for the OM Infotype field. |
OM Field name |
The field of the OM infotype. This is an optional field. |
Only max level |
Only the last object in the object chain along the path is evaluated, not all intermediate objects. This is an optional field. |
Technical depth |
Follows only the given number of objects in the object chain. This is an optional field. |
Use Exit |
Whether or not customer exits should be called for this configuration. This is an optional field. |
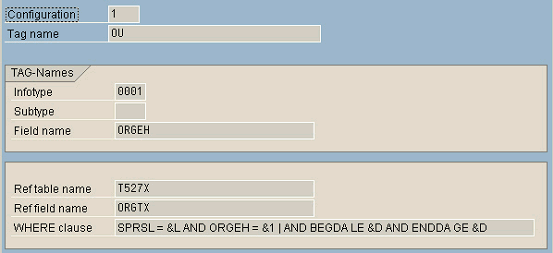
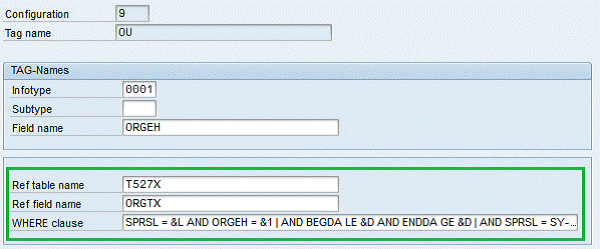
Reference tables
Reference tables - table, field and value - can be specified for any attribute that holds a key to the textual expression of its contents. Using this feature requires extensive knowledge of the HR component. Use the ERP data dictionary to determine reference tables and relationships for the selected attributes. For example, in the OU attribute of the default configuration, the statement:
SPRSL = &L AND ORGEH = &1 AND BEGDA LE &D AND ENDDA GE &D
selects the row from table T527X with the current language (SPRSL = &L), the reference key itself (ORGEH = &1), and provides for the correct time period (BEGDA LE &D AND ENDDA GE &D). From the row selected, the content of the field specified in the Field column (ORGTX) is then used as the attribute value.
Only variables &1, &D, and &L are allowed in the expression. Specifying a ABAP functional module call is prohibited.
|
OM data related a person or related to OM object
To export data from any OM object related to a person or related to one OM object, use the columns Evaluation Path, OM Infotype, OM Subtype, and OM Field name.
Generated DN - Key
SAPAgent exports the selected keys or just the Personnel number (PNO), if no keys are specified. The PNO is the primary key for ordering and the selected keys should follow in order of precedence.
Consider a situation with an organizational unit which was initially created starting on April 30, 2016 and is split on May 22, 2016 because of a name change:
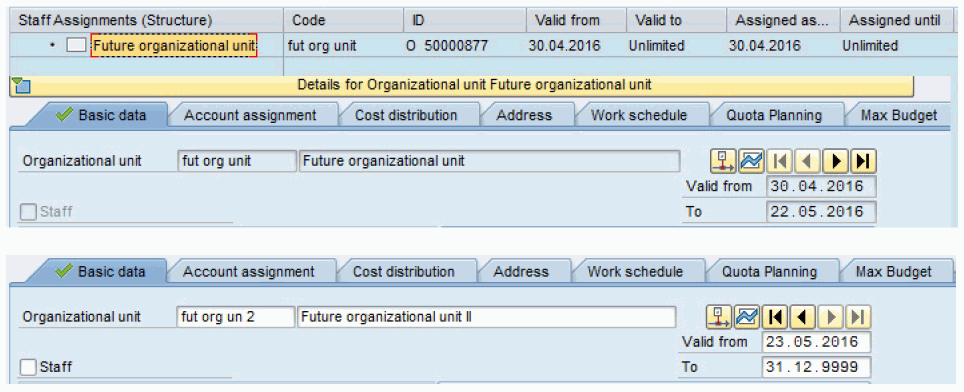
An export executed on May 1, 2016 without Days to look ahead yields this result:
# DEFAULT_CONF_OM20160501114917.TXT
version: 1
DN:ID_OF_NODE=50000877
ADDRESS_CITY_OF_AN_ORG_UNIT:
BEGDA:20160430
BELONGS_TO_ORG_UNIT_ID:50000000
BELONGS_TO_ORG_UNIT_NAME:target world organisation
ENDDA:20160522
FULL_NAME_OF_AN_EMPLOYEE:
ID_OF_NODE:50000877
LONG_TEXT_OF_OBJECT:Future organizational unit
RELATIONS:50000000
An export executed on May 1, 2016 with Days to look ahead set to 30 yields this result:
version: 1
DN:ID_OF_NODE=50000877
ADDRESS_CITY_OF_AN_ORG_UNIT:
BEGDA:20160430
BELONGS_TO_ORG_UNIT_ID:50000000
BELONGS_TO_ORG_UNIT_NAME:target world organisation
ENDDA:20160522
FULL_NAME_OF_AN_EMPLOYEE:
ID_OF_NODE:50000877
LONG_TEXT_OF_OBJECT:Future organizational unit
RELATIONS:50000000
DN:ID_OF_NODE=50000877
ADDRESS_CITY_OF_AN_ORG_UNIT:
BEGDA:20160523
BELONGS_TO_ORG_UNIT_ID:50000000
BELONGS_TO_ORG_UNIT_NAME:target world organisation
ENDDA:99991231
FULL_NAME_OF_AN_EMPLOYEE:
ID_OF_NODE:50000877
LONG_TEXT_OF_OBJECT:Future organizational unit II
RELATIONS:50000000
| Look-ahead includes the complete history of the organizational unit. It would be an option to export ONLY the value at the aligned key date and then only the second data set would be exported. |
Job Definition
A job definition provides information about the configuration for the ERP job scheduler. You use the Job area of the vertical selection dialog box to define a job.
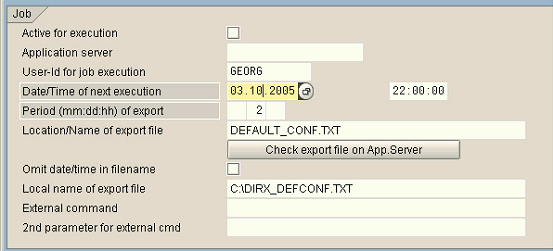
The next sections describe the fields within the Job area.
- Active for Execution
-
This field selects whether the configuration is active or inactive. Select this field to create a job definition for the selected configuration. If you do not select this field, SAPAgent does not generate a job definition for the configuration. However, SAPAgent will include the configuration in the transport to the production system, where it can be activated at a later date for scheduling with the Synchronize with job management selection.
You can also use the Enable Configuration and Disable Configuration selections in the Scheduling menu to activate and deactivate selected configurations. See the section "Configuration Activation" for more information.
- Application Server
-
This field specifies an application server that is to run the job. This is an optional field; if it is not specified, the ERP load balancing subsystem selects the server.
- User ID for Job Execution
-
This field specifies the user ID that is to run the job on the target system. The user ID specified must have access to the Human Resources system and have the authorization required for running background jobs. This is a mandatory field.
- Date/Time of Next Execution
-
This field specifies the date and time at which the job is to be run for the first time. You can select this value from a calendar dialog and an hours dialog using F4. This is a mandatory field.
- Period of Export
-
This field specifies the time interval for subsequent executions of the job. You can specify the period between job executions in months (mm), days (dd), or hours (hh). For example, the value 7 in the dd field schedules subsequent job execution every seven days from the date/time specified in the Date/Time of Next Execution field. The notation: The value 5 in the dd field and 3 in the hh field schedules subsequent job execution every 27 hours from the date/time specified in the Date/Time of Next Execution field.
The shortest time period you can select is 1 hour. This is a mandatory field.
- Location/Name of Export File
-
This field specifies the file name or full pathname of the export data file. The path must be to a shared directory so that all instances of the ERP scheduler can access it. If no path is specified, SAPAgent uses the ERP default data directory; see the ERP documentation for details about the default data directory. This is a mandatory field.
You can use the check export file on App server button to check whether the ERP system can create and write to the specified file. If you use this button, the verification process deletes the specified export data file if it already exists.
- Omit date/time in filename
-
This field specifies whether a timestamp in the generated export filename should be omitted or not. By default a timestamp is appended to the filename of the export file, for example if the name is “full_1.TXT” the exported data is written to “full_1timestamp.TXT” where timestamp is in the format yyyymmddhhmmss.
If the timestamp is omitted each export overwrites the last generated export file. No automatic clean-up takes place to delete export files. Delete export files that are no longer in use to save disk space.
- Local Name of Export File
-
This field specifies the file name on the local file system that SAPAgent is to use when it is invoked to copy the export data file from the remote ERP system to the local system. Use the Copy Export File selection in the Extras menu to copy an export data file back to a local system. This is an optional field.
- External Command
-
This field specifies a program to be executed after the job completes. The root for external commands is:
-
/usr/sap/SAP_system_ID/SYS/exe/run (UNIX)
-
\\host_name\sapmnt\SAP_system_ID\SYS\exe\run (Windows)
This is an optional field.
-
- Second Parameter for External Command
-
This field specifies a parameter to be applied to the program specified in the External Command field. This is an optional field. The value specified in this field is applied as a second parameter to the program specified in the External Command field; the first parameter is the path and/or file name of the export data file. (The name of the generated export data file is inserted between the two parts of the external command.)
Change Configuration
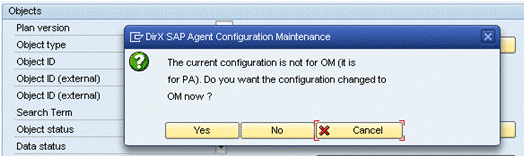
If an inappropriate processing is selected for an existing configuration, the user is notified and may cancel the operation, or change the configuration (from PA to OM or inverse):
Default Configuration
The base configuration consists of the following defaults:
-
Daily delta export at 22:00 into the export data file default_conf.txt in LDIF format for the user "GEORG"
-
The configuration is not activated.
-
The vertical selection selects All Personnel numbers with employee status "Active". There are no other exclusions.
The default horizontal selection is shown in the following table:
| Tag | Info type |
Sub type |
Field name | Part of DN | Ref table / field | Description | Comment |
|---|---|---|---|---|---|---|---|
BD |
0002 |
GBDAT |
Birth date |
||||
BLD |
0032 |
GEBNR |
Building number |
||||
CN |
0002 |
CNAME |
Common name |
||||
COM |
0032 |
COM01 |
Internal communication type |
||||
EXT |
0032 |
TEL01 |
Internal telephone number |
Extension |
|||
FTN |
0105 |
5 |
UsrID |
Fax telephone number |
UsrID_long |
||
GN |
0002 |
VORNA |
X |
Given name |
|||
HPA |
0006 |
1 |
ORT01 |
Home postal address |
|||
HPC |
0006 |
1 |
PSTLZ |
Home postal code |
|||
HSTA |
0006 |
1 |
STRAS |
Home street address |
|||
HTN |
0006 |
1 |
TELNR |
Home telephone number |
|||
I |
0002 |
INITS |
Initials |
||||
NAT |
0002 |
NATIO |
Nationality |
||||
NO |
0032 |
NUM01 |
Internal communication number |
||||
O |
0001 |
BUKRS |
T001/ BUTXT |
Organization |
Company code/ |
||
OKEY |
0001 |
VDSK1 |
Organizational key |
||||
OU |
0001 |
ORGEH |
T527X/ ORGTX |
Organizational unit |
|||
PAREA |
0001 |
WERKS |
T500P/ NAME1 |
Personnel area |
i. e. location/divison |
||
PNO |
0000 |
PERNR |
X |
Personnel number |
|||
PSAREA |
0001 |
BTRTL |
T001P/ BTEXT |
Personnel subarea |
i. e. division/location |
||
RMB |
0105 |
0010 |
UsrID_Long |
SMTP address |
|||
ROOM |
0032 |
ZIMNR |
Room number |
||||
SAL |
0002 |
ANRED |
T522T/ |
Salutation |
|||
SAPID |
0105 |
1 |
UsrID |
SAPOffice user identifier |
UsrID_long |
||
SN |
0002 |
NACHN |
X |
Surname |
|||
TIT |
0002 |
TITEL |
T535N/ TITEL |
Title |
Transport from Customizing to Production
SAPAgent assists in the transport of customizing information by storing all relevant objects in a selectable transport. The customizing transport itself must be generated using transaction SE10 or within the pop-up selection dialog. Use the Extras menu of the SAPAgent main window to transport configurations.
To transport all configurations (and security information) from a development system to a production system:
-
From the Extras menu, select Transport Customizing
-
On the selection screen, check the Execute button.
-
Use the Execute icon or press F8 to start the generation of the customizing transport.
-
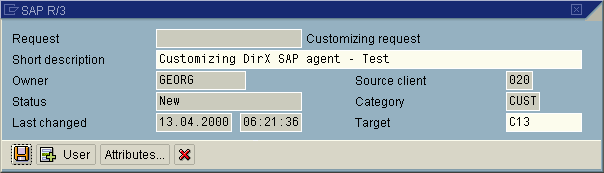
SAPAgent creates a transport with the attribute CUST. The SAPAgent customizing data will be imported into this transport. In Short Description, supply a short description for the transport.
-
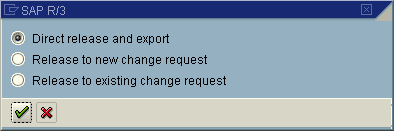
A pop-up appears to confirm the release of the transport (if you cancel the release here you can release (or delete) the transport later using transaction SE10).
The transport is exported from ERP to two local files. SAPAgent displays a result dialog box that summarizes the transport export process:
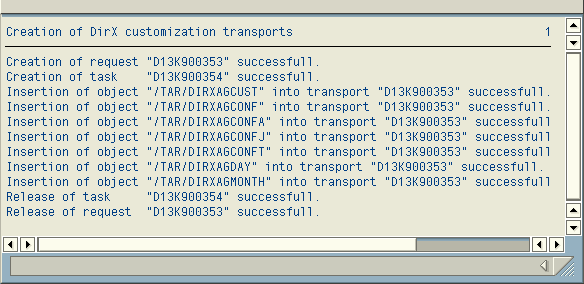
The files generated during this process can now be copied to the production system and imported there using standard ERP methods.
Configuration Activation and Immediate (ad-hoc) Execution
If you have created an inactive configuration, you can set it to an active job definition. Conversely, you can deactivate an active configuration. Use the Scheduling menu selection in the SAPAgent main window to activate and deactivate configurations.
To activate a configuration:
-
From the SAPAgent main window, select the configuration.
-
In the Scheduling menu, select Enable Configuration.
To deactivate a configuration:
-
From the SAPAgent main window, select the configuration.
-
In the Scheduling menu, select Disable Configuration.
You can also use SAPAgent to perform immediate (or "ad-hoc") execution of a configuration. To perform an immediate transfer:
-
From the SAPAgent main window, select the configuration.
-
In the Scheduling menu, select Immediate Export.
To force a full export immediate transfer for a delta export configuration:
-
In the Extras menu, select Force full export.
-
In the Scheduling menu, select Immediate Export.
Job Scheduling
Use the Synchronize DirX Conf’s to R/3 Jobs selection in the Scheduling menu of the SAPAgent main window to schedule all of the SAPAgent transfers that you have configured and activated. The following figure shows the job scheduling dialog that SAPAgent displays.
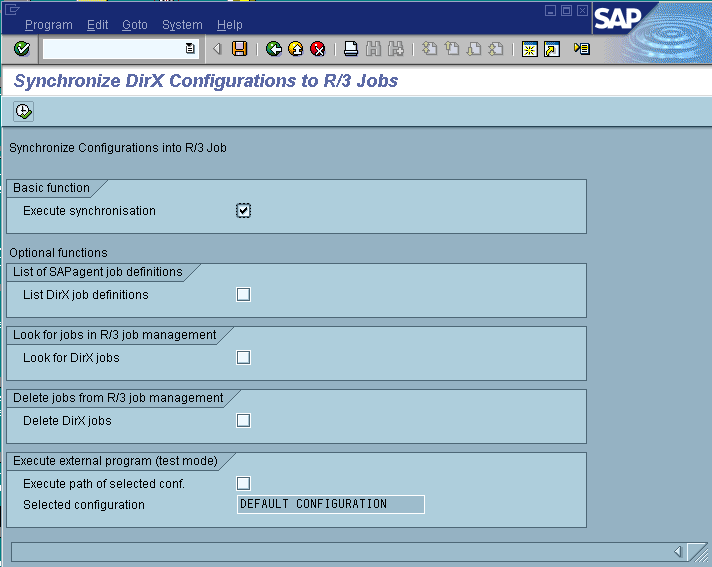
The next sections describe the fields in the job scheduling dialog box.
- Execute Synchronization
-
This field controls the SAPAgent job scheduling function. To activate job scheduling:
-
Check the Execute Synchronization field
-
Press F8 or click the Execute button
SAPAgent schedules all active configurations (configurations whose job definitions' Active for Execution field are checked) with the ERP job scheduler and generates a report. For example:

SAPAgent automatically creates a name for each job in the format:
-
DIRX_AGconfig_number
Where config_number is a four-digit code that identifies the configuration. The report highlights in red the jobs that SAPAgent was not able to enter into the ERP job management system. Common reasons for being unable to schedule jobs include:
-
The start date specified in the job definition’s Date/Time of Next Execution field is older than the current time
-
The user ID specified in the job definition’s User ID for Job Execution field is not present on the system or does not have the necessary rights to execute background jobs
The generated report name is “/SIE/DIRXAG_PNPSEL”, the variant is “PNPSELconfig_number”.
-
- List DirX Job Definitions
-
This field controls whether SAPAgent creates a list of the configurations it has created. When this field is checked, SAPAgent generates a short description of each active and inactive configuration that it has created.
- Look for Jobs in ERP Job Management
-
This field controls whether SAPAgent creates a list of all SAPAgent configurations that have been scheduled as ERP jobs. When this field is checked, SAPAgent generates a list of configurations with the following notations:
-
 (green) the configuration is running or has completed without errors
 -
x (red) the configuration has aborted or is incomplete
-
+ the configuration has been scheduled
-
- Delete DirX Jobs
-
This field controls whether SAPAgent deletes all of the jobs it has scheduled. When this field is checked, SAPAgent removes all of the ERP jobs it has scheduled. Deleted jobs must be reconfigured with a new start date and must be reactivated before they can be re-scheduled as ERP jobs.
- Execute Path of Selected Configuration
-
This field allows you to test the executable programs you have specified in the job definition. To use this field, select a configuration and check the box.
Export Procedure
A SAPAgent transfer can be scheduled for execution through the ERP job scheduler or for immediate execution. When a transfer, or job, is scheduled for ERP, execution of an export is handled entirely by the ERP job scheduler and takes place even if SAPAgent (transaction code /sie/dirx_ag) is not active. You use the Synchronize DirX Conf’s to ERP Jobs selection in the Scheduling menu to manage the scheduling of jobs with ERP. Transfers (jobs) can be also viewed with the standard transaction 'SM37'.
You can also bypass the ERP scheduler and schedule a transfer for immediate execution using the Immediate export selection in the Scheduling menu. A message indicates the end of the immediate export.
All SAPAgent export operations rely on the exchange of files. SAPAgent follows a protocol during export operation to ensure consistent treatment of these files. Note that it is the ERP application server running SAPAgent that is executing the file operations. This fact can cause unexpected results in distributed ERP systems that run multiple application servers. For these types of installations, it may be necessary to:
-
Mount specific directories over the network
-
Link SAPAgent to a specific application server
Consult with the SAP ERP administrators of the installation to find and implement the appropriate solution(s).
The specification of the transfer directory can be based on physical names (system, for example, /usr/SAPagent/Transfer) or logical names (ERP, maintained using transaction FILE, for example, SAPagentTransferDirectory).
The export procedure proceeds as follows:
-
SAPAgent is scheduled by hand or with the ERP job scheduler
-
SAPAgent creates the export data file with the name Export_File_NameDateTime[.ext]
-
The ERP job management system calls the optional system command, script or application supplying the filename and a set of parameters.
You can use the Copy Export File selection in the Extras menu to transfer a generated export data file to the presentation server (that is, the local PC).
The following informational message box can be ignored (ERP internal issue). Just click on Continue or press Enter to continue.
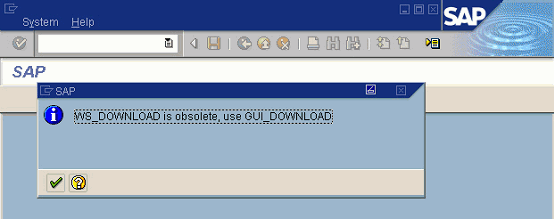
After the downloading is completed another message box (“Transfer complete”) informs about successful copying.
| If you use the SAPAgent (Unicode) be sure to set the Upload/Download Encoding for the SAP GUI to “Default UTF8 for Unicode Systems”. To specify this value select the Unicode system entry in the SAP logon, right click “Properties” and then “Advanced”. Then specify the value in the Advanced Options dialog under “Encoding for Upload/Download”. |
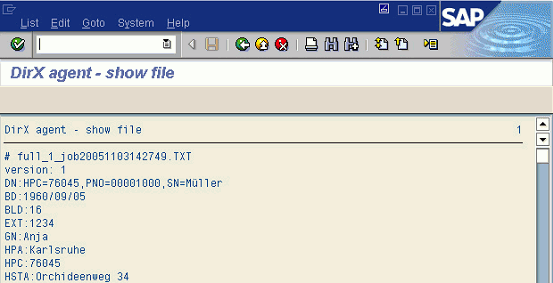
You can use the Show Export File selection in the Extras menu to view a generated export file.
Delta Export Procedure
The SAPAgent delta export no longer uses the "Change documents" ("Belegschreibung") mechanism. The delta reference is held in SAPAgent’s internal cluster tables.
Please note the following about SAPAgent delta export:
-
The SAPAgent delta mechanism operates on the basis of a daily time pattern. If you perform a full export and a delta export on the same day and changes to the ERP database also occur, the changes are exported twice. Consequently, your scripts to import SAPAgent output to other directories should be designed to handle duplicate change records.
-
The ERP system allows you to make updates that become effective at a future date. The SAPAgent delta mechanism does not recognize updates made to the ERP database before the first export that are to become effective sometime after the first export. Instead, any full export will recognize them. Consequently, it is recommended to use a time schedule that consists of a cycle that equals one full export and several subsequent delta exports.
Security Features
An HR system operates with highly confidential data and must therefore be maintained under several aspects of security. It should prevent any unauthorized export; at least not under specific allowance and control. In most installations, special guidelines from the public (for example, in Germany: Bundesdatenschutz bestimmungen) and from the company (in Germany: Betriebsvereinbarungen) must be followed.
SAPAgent implements the following features to guarantee the highest possible security:
-
Two levels of security: administration and configuration
-
Denial of selection of fields of specific types (for example, currency)
-
Selection of the maximum set of allowed fields
-
Logging of all activities (transfers and changes to configuration and scheduling) to provide a historical record of everything that happened in the system and who was responsible for it.
These security features are configurable (by a system administrator, not by the user) to allow tailoring for the individual needs of an installation.
SAPAgent also includes the following functions to prevent unauthorized export or modification of confidential data:
-
Positive list of trusted (ERP) users
-
Positive list of infotypes
-
Positive list of fields in the trusted users and infotypes structures. Use the "*" identifier to select all fields of one structure.
-
Denial of fields of type "CURR" (currency)
-
Denial of fields of type "DATE" (date).
These features must be configured by an ERP-knowledgeable administrator using the field/value pairs in the table /sie/dirxagcust. SAPAgent does not provide a special user interface for configuring these features.
The following table shows the attributes that control whether a transfer for any configuration will succeed or fail. For any configuration, the entire transfer will fail if one of the attributes shown in the table is violated. The transfer is allowed if none of these attributes is violated.
| Attribute Name | Type | Multiple | Description | Example Value |
|---|---|---|---|---|
SECLIMITUSER |
Boolean |
Limit users to the following list |
X |
|
SECUSER |
Text |
X |
Name of an allowed user |
DIRX |
SECLIMITCURR |
Boolean |
Deny CURR fields |
||
SECLIMITDATE |
Boolean |
Deny DATE fields |
||
SECLIMITFIELD |
Boolean |
Allow only fields of the following list |
||
SECFIELD |
Text |
X |
Pair (table, field) allowed for selection. "*" for all fields |
0002, vorna |
The security features described here are set to default values (all selections are allowed) and can be changed during the customization phase. SAPAgent transfers any changes to these values that are made during customization to the production system in the customizing transport operation.
The security features described here are only valid during SAPAgent execution in a production system; they are not verified during customization. If security is violated when a transfer begins, the entire transfer is cancelled and a log entry is generated.
Customer Exits
The SAPAgent includes a set of exits to allow customer specific extension of the built-in functionality. The exits are implemented using the SAP Business Add-Ins (‘BAdI’) technology. There is a BAdI definition for every exit. To use an exit, a BAdI implementation (an ABAP objects method) must be developed.
There are the following exits:
-
Excluding a person or OM object from export
-
Computing a value of a user-defined tag
-
Exporting multiple virtual employees
|
Exits to modify/disable the processing of a person or an OM object
There are two definitions, one for a person export and the other for an OM object export.
For both definitions the following input parameters are passed to the method:
CONFIGURATION
Specifies the configuration identifier (id=number).
CONTENT
A structure of strings that matches the actual configuration. Here is an example, if you use the default configuration:
data bd like p0002-gbdat.
data bld like p0032-gebnr.
data cn like p0002-cname.
data com like p0032-com01.
data ext like p0032-tel01.
data ftn like p0105-usrid.
data gn like p0002-vorna.
data hire like p0000-massn.
data hpa like p0006-ort01.
data hpc like p0006-pstlz.
data hsta like p0006-stras.
data htn like p0006-telnr.
data i like p0002-inits.
data nat like p0002-natio.
…
In a BAdI implementation you can either specify the content in a structure as given in the example above or you access the structure by specifying offset and length.
EVENT
Is a flag specifying the time when the exit is called while processing each object (a person or an OM object) in an export. Valid values for this flag are:
-
B: Call the exit before evaluating the object’s attribute values. If you can exclude a person or an OM object just on the knowledge of the personnel number or the object identifier specifying this value results in a faster processing.
-
A: Call the exit after evaluating the object’s attribute values. The CONTENT parameter delivers a list of all evaluated object’s attribute value pairs. The exclusion can then include this information to determine whether an object should be excluded from export or not.
Additionally to the parameters above the following input parameter is passed to the method for a person export:
PERNR
Specifies the personnel structure.
The following input parameter is passed to the method for an OM object export:
OBJEC
Specifies the OM object structure.
The method delivers the following output parameter:
STATUS
Specifies whether an object is excluded from the export (value 1) or not (all values not equal 1).
Of course there may be several configurations using exclusion. However, you should activate only one implementation. The configuration class and the configuration identifier specify the actual activated configuration.
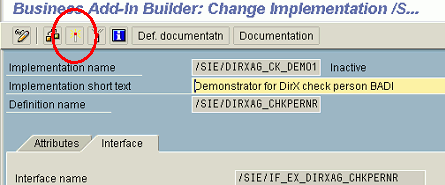
Here is an example for a person export method:
BAdI Definition:     /SIE/DIRXAG_CHKPERNR
Interface:               /SIE/IF_EX_DIRXAG_CHKPERNR
Method:                CHECK_PERSON
Parameters:

Here is an example for an OM object export method:
BAdI Definition:     /SIE/DIRXAG_CHKOBJ
Interface:               /SIE/IF_EX_DIRXAG_CHKOBJ
Method:                CHECK_OBJECT
Parameters:

Exits to compute the value of a user-defined tag
There are two definitions: one for a person export and the other for an OM object export.
For both definitions, the following input parameters are passed to the method:
CONFIGURATION
Specifies the configuration identifier (id=number).
TAG NAME
Specifies the tag name.
FIELD NAME
This parameter is not used and therefore is always empty.
FIELD VALUE
The value that the agent computes before calling the exit.
Additionally to the parameters above the following input parameter is passed to the method for a person export:
PERNR
Specifies the personnel structure.
The following input parameter is passed to the method for an OM object export:
OBJEC
Specifies the OM object structure.
The method delivers the following output parameter:
RETVALUE
Returns the computed user-defined tag value.
There may be several user-defined tags per configuration and several configurations using user-defined tags. However, you should activate only one implementation. The implementation class, configuration identifier, and the tag name specify the current activated configuration and tags.
Here is an example for a user-defined tag in a person export method:
BAdI Definition:     /SIE/DIRXAG_UF_PERNR
Interface:               /SIE/IF_EX_DIRXAG_USERFUNC
Method:                EVALUATE_PERNR_TAG
Parameters:

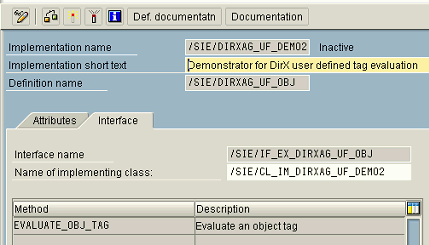
Here is an example for a user-defined tag in an OM object export method:
BAdI Definition:     /SIE/DIRXAG_UF_OBJ
Interface:               /SIE/IF_EX_DIRXAG_UF_OBJ
Method:                EVALUATE_OBJ_TAG
Parameters:
To enable a tag as a user exit, specify a X in the Use Exit field in the Change View "Tag-Names": Details dialog box. (See the section "Horizontal (Attribute) Selection" above for details.) The agent evaluates the Infotype and Field name fields of the tag before calling the exit. It passes the resulting value to the exit.
Export of multiple virtual employees
This functionality is provided by an additional BAdI:
BAdI Definition: /SIE/DIRXAG_ADDPERNR
Method: GET_ADD_PERSONS
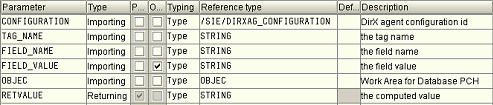
Parameters
This method accepts the following parameters:
| Name | Type | Associated Type | Description |
|---|---|---|---|
CONFIGURATION |
Importing |
/SIE/DIRXAG_CONFIGURATION |
Configuration Key |
PERNR |
Importing |
PERNR |
Personnel Number |
BEGDA |
Importing |
BEGDA |
Start Date |
MASK |
Importing |
ANY |
Structure of configuration |
VIRTUAL_PERSONS_PERNR |
Exporting |
HCM_PERNR_TABLE |
Table of personnel numbers |
VIRTUAL_PERSONS_CONTENT |
Exporting |
STANDARD TABLE |
Table of virtual persons (like MASK) |
On a call of an implementation of the above BAdI, the agent supplies the configuration number (so that the BAdI can distinguish between different configurations), the PERNR object (NOT only the personnel number) of the actual (real) employee and the key date for which the employee’s data is being extracted.
The BAdI implementation is then expected to return a table of generated personnel numbers (Type PERNR_D) in parameter VIRTUAL_PERSONS_PERNR and a corresponding table of virtual employees with each entry of the same structure as MASK in parameter VIRTUAL_PERSONS_CONTENT.
Example Coding
Assuming the following TAG configuration:
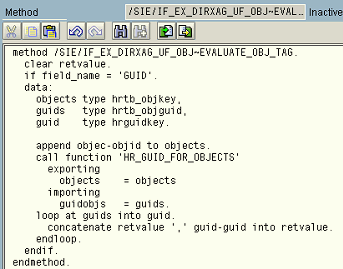
Here is the corresponding BAdI implementation:
method /SIE/IF_EX_DIRXAG_ADDPERNR~GET_ADD_PERSONS.
*
* Sample implementation of BAdI /SIE/DIRXAG_ADDPERNR.
* This implementation adds two virtual employees
* for an existing employee FOR_EMPLOYEE in configuration IN_CONFIGURATION.
*
* The implementation assumes the data of a virtual employee to be of structure:
*DATA BEGIN OF SNEW.
*DATA GN LIKE P0002-VORNA.
*DATA HSTA LIKE P0006-STRAS.
*DATA OU LIKE P0001-ORGEH.
*DATA PNO LIKE P0000-PERNR.
*DATA SN LIKE P0002-NACHN.
*DATA END OF SNEW.
*
* This directly corresponds to the 'TAGS' definition of the configuration.
* An ABAP type with exactly this structure is supplied in parameter MASK
* and should be used as a reference.
*
constants:
for_employee type pernr_d value '00001001',
in_configuration type /sie/dirxag_configuration value '0009'.
data:
dref type ref to data.
field-symbols:
<fs1> type any,
<fs2> type any.
clear: virtual_persons_pernr[], virtual_persons_content[].
case configuration.
when in_configuration.
case pernr-pernr.
when for_employee.
* First virtual employee
create data dref like mask. " Allocate memory for data of one virtual employee
assign dref->* to <fs1>. " and assigned the memory to a field symbol (pointer).
clear: <fs1>.
assign component 'GN' of structure <fs1> to <fs2>. " Assign pointer to a specific…
if sy-subrc is initial. " In case of success set data.
<fs2> = 'Joe'.
endif.
append '90000001' to virtual_persons_pernr. " Append the PERN to the return list.
append <fs1> to virtual_persons_content. " Append the new data line.
* Second virtual employee
create data dref like mask. " Allocate memory for data of one virtual employee
assign dref->* to <fs1>. " and assigned the memory to a field symbol (pointer).
clear: <fs1>.
assign component 'HSTA' of structure <fs1> to <fs2>. " Assign pointer to a specif...
if sy-subrc is initial. " In case of success set data.
<fs2> = 'Road to nowhere'.
endif.
append '90000002' to virtual_persons_pernr. " Append the PERN to the return list.
append <fs1> to virtual_persons_content. " Append the new data line.
endcase.
endcase.
endmethod.
Example Output
Based on the BAdI implementation sample but with all fields of the two virtual employees filled, this is the resulting export file:
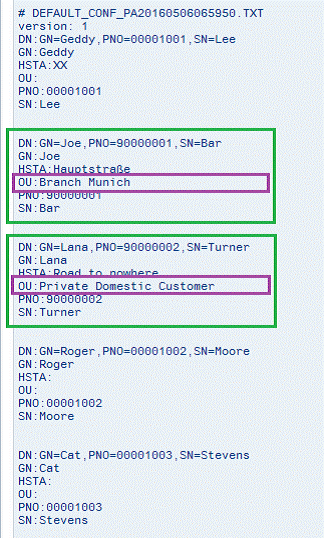
You can see that the two "virtual" persons 90000001 and 90000002 have been inserted between the "real" persons 00001001 and 00001002 with the values assigned to them in the BAdI implementation. The DN has also been constructed by these values.
Output Transformation via Reference Tables
| No longer used. BadI returns "text" values. |
Looking at the definition of tags for this configuration, the definition of tag "OU" defines a value replacement via the organizational unit’s text table (T527X):
This is also performed for virtual persons, so just the key has to be inserted into the virtual person; the SAPAgent automatically transforms the key to a text value via the reference definition. The corresponding coding in the BAdI for virtual person 90000001’s OU is:

The output file shows the transformed value:
Delta Processing
The virtual person records are subject to the SAPAgent’s delta processing.
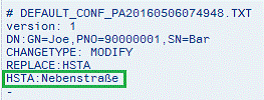
If in the example above, the BAdI implementation would return a different value for any tag:

A MODIFY record would be created:
Tags with Multiple Values
Tags can be defined to return a list of values instead of a single value:
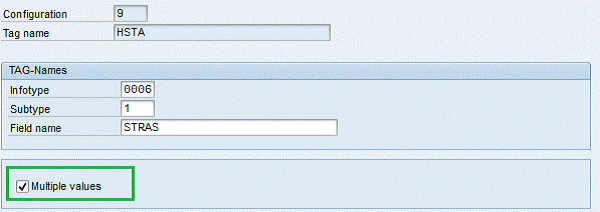
In these cases, the BAdI implementation must deal with field symbols and operations to internal tables instead of data elements (note the usage of field symbol <fs2t> instead of <fs2> :
Definition:
field-symbols:
<fs1> type any,
<fs2> type any,
<fs2t> type standard table.
Assigning the internal table and inserting data:
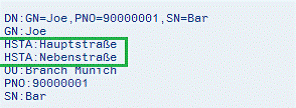
assign component 'HSTA' of structure <fs1> to <fs2t>. " Assign pointer to itab
if sy-subrc is initial. " In case of success set data.
append 'Hauptstraße' to <fs2t>.
append 'Nebenstraße' to <fs2t>.
endif.
The corresponding output looks like this:
Case study 1: Creating an exit for a person selection
This case study provides an example how to set up an exit for a person selection. Perform the following steps:
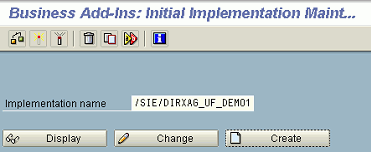
-
Start the BAdI implementation (transaction SE19).
-
Enter a (new) name for the BAdI implementation in your customer or in the Z* namespace.
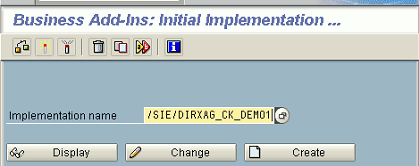
-
Select the correct BAdI definition (here ‘/SIE/DIRXAG_CHKPERNR’):
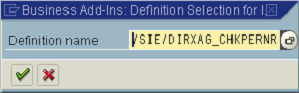
-
Enter a description and (optionally) modify the name of the implementing class, then select method ‘CHECK_PERSON’
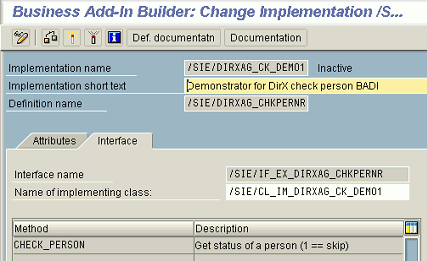
-
Implement the method (the example here disables persons of employee subgroup ‘DT’)
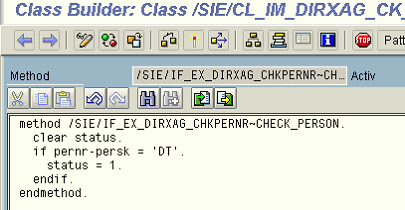
-
Activate the BAdI implementation
Case study 2: Creating an exit for user defined tag evaluation (here OM)
This case study provides an example how to set up an exit for user-defined tag evaluation of an OM object. Perform the following steps:
-
Start BAdI implementation (transaction SE19)
-
Enter a (new) name for the BAdI implementation in your customer or the Z* namespace
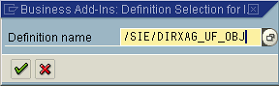
-
Select the above BAdI definition (‘/SIE/DIRXAG_USERFUNC’):
-
Enter a description and (optionally) modify the name of the implementing class, then select method ‘EVALUATE_OBJ_TAG’
-
Implement the method (the example here concatenates the GUIDs of an object)
-
Activate the BAdI implementation

Case study 3: Defining a tag to report a user’s "hire" date
This case study provides an example how to set up an exit for defining a user-defined tag to report a user’s hire date. It is implemented using the same procedure as case study 2 above.
The code below demonstrates the exit implementation to fill the tag "HIRE" in configuration "1". The hire-semantic is customer specific and therefore this example may not work in every installation.
The administrator must enter the values for the Infotype (value 0000) and Field name fields (value MASSN). The agent evaluates these values. The retrieved value is not used in this exit.
method /SIE/IF_EX_DIRXAG_USERFUNC~EVALUATE_PERNR_TAG.
if configuration >= 0.
  if tag_name = 'HIRE'.
  data:
    pphifi       type table of phifi,
    pp0000       type table of p0000,
    pp0001       type table of p0001,
    phifi        like line of pphifi,
    hiredate(10) type c.
    retvalue = 'unknown'.
      CALL FUNCTION 'HR_READ_INFOTYPE'
      EXPORTING
        pernr                 = pernr-pernr
        infty                 = '0000'
      tables
        infty_tab             = pp0000
     EXCEPTIONS
       INFTY_NOT_FOUND       = 1
       OTHERS                = 2.
    IF sy-subrc <> 0.
      retvalue = 'no 0000'.
    ENDIF.
      CALL FUNCTION 'HR_READ_INFOTYPE'
      EXPORTING
        pernr                 = pernr-pernr
        infty                 = '0001'
      tables
        infty_tab             = pp0001
     EXCEPTIONS
       INFTY_NOT_FOUND       = 1
       OTHERS                = 2.
    IF sy-subrc <> 0.
      retvalue = 'no 0001'.
    ENDIF.
      CALL FUNCTION 'RP_HIRE_FIRE'
      TABLES
        pphifi          = pphifi
        pp0000          = pp0000
        pp0001          = pp0001.
    loop at pphifi into phifi.
      if not phifi-hires is initial.
        write phifi-begda to hiredate.
        move hiredate to retvalue.
      endif.
    endloop.
  endif.
endif.
endmethod.
Configuring OM Extracts
This section provides detailed information on how to export OM extracts.
The SAP Agent allows including OM information in its exports. Beacaure of the complexity of PD/OM, it is not easy to understand the capability of this functionality. As a result, the section describes it based on examples.
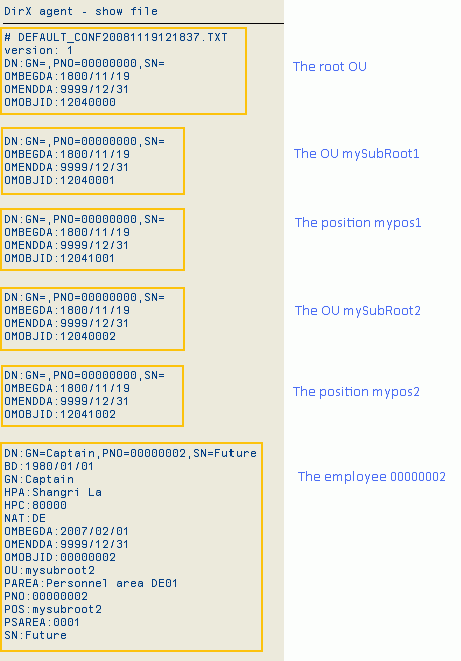
Suppose you have the following OM structure:
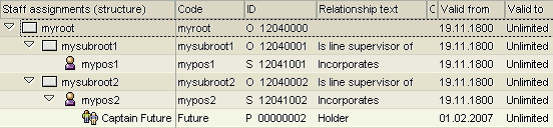
You can use transaction PPOME to view the hierarchy of the organizational unit, the related objects and some of the associated info types. The screenshot shown here is from a PPOME display. You can use PPOME (or the older PP01) to create the hierarchy shown in the screenshot to allow you to replay the following examples.
The SAPAgent provides two mechanisms to export information from the PD component:
-
Objects related to an employee
-
Objects selected directly from PD
They will be explained in the following sections.
Objects Related to an Employee
This is used in the "tag" details configuration, where it allows to maintain an evaluation path to go from an employee’s OM relevant information (common are ORGEH or PLANS in infotype 0001) to the details of that OM object.
Example:
Assume in a standard PA export the following definition of tag POS:
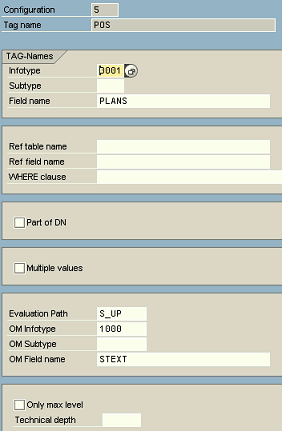
Then, for the selected employee’s every infotype 0001 record, the content of the position (field PLANS) is taken and OM’s evaluation path ‘S_UP’ is used to define the owning organizational unit of this position, and from this organizational unit’s object definition (infotype 1000) the description (field STEXT) is returned.
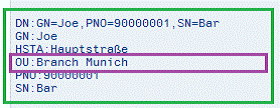
Yielding in an output like:
POS:mysubroot2
POS:myroot
It can be seen that all the related OUs of the position of the employee are listed. If only the root is needed, then ‘Only max level’ should be specified; if only the direct OU of the position is needed, then a ‘Technical depth’ of 2 should be specified in the tag’s configuration.
Objects Selected Directly from PD
For a SAPAgent export defined on above OU hierarchy this would be a valid "tag" configuration:
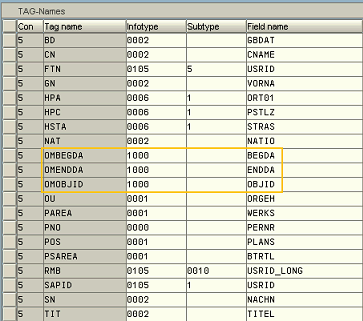
Especially take note, when looking at the details of for example the OMOBJID tag, it is not necessary (that is it would not work as expected) to mark OM specifications additionally here:

Shown below is a valid "attributes" configuration:
It uses the (common) "O-S-P" evaluation path (selectable via the F4 help in the SAPAgent’s tag detail configuration) to travel from a given OU via (even multiple sub OUs) to a position and then to the associated employee:
However, you may wonder why you get the same (one) employee multiple (2) times in your export file. This is so because it will be found beneath organizational units myroot and mysubroot1.
Therefore a more elegant way would be to restrict only to the root(s) of the organizational units:
The complete export would then look like this:
Export File Formats
SAPAgent generates the following export data file formats:
-
CSV format
-
LDIF content format
-
LDIF change format
-
LDIF change format with modified changetype:modify records
CSV and LDIF content are used for full exports, and LDIF change format is used for delta exports.
CSV Format
CSV format is used for full exports that are to be processed with Microsoft Excel. SAPAgent full export data files in CSV format have the following characteristics:
-
The first line of the file contains the column names.
-
All attributes (items) of an entry (object) are distinguished by a separator character; this separator character can be customized. All attributes are embedded into a pair of double quotes ("") to guarantee that MS Excel can read the information even if there are special characters embedded; if an attribute contains a double-quote character, the character is replaced by a '"" sequence.
-
Special characters are output in C notation using the backslash (\) escape character. A backslash itself is transformed into a \\ sequence.
-
Entries are separated by different lines using a CR/LF end-of-line marker. The first line names the attributes; the following lines contain the entries.
-
Multiple attribute values are held in one field separated by a second separator character.
-
Subtypes are treated equally; the subtype field specifies the content.
Here is an example of SAPAgent CSV format where separator 1 is the comma (,) and separator 2 is the semicolon (;):
UserName,Comment,FullName,UserID
"Test1",,"Hugo Test1,"1234"
"Test2","second";"and last","Hugo Test2","1235"
LDIF Content and Change Formats
SAPAgent LDIF content and change formats have the following general characteristics:
-
All attributes (items) of an entry (object) are placed in separate lines. Each line consists of the attribute’s name and value, separated by a colon (':').
-
Empty lines separate entries.
-
Multiple instances of the same entry appear on separate lines with the same tag.
-
Any group of key attributes related to one person is identified by a distinguished name (dn) line. When present in an LDIF change file, it is marked by a "changetype" value. The changetype on the DN is not supported. The format of the distinguished name line is:
dn: cn=ID
The primary key is always the personnel number but can be extended by other key attributes (as specified during horizontal selection). For example:
dn: PNR=00000027, SN=Winter
SAPAgent supports the following change types:
-
add - All attributes (tags/values) are supplied for the new entry.
-
modify - Any attribute/value (tag /value) can follow. If prefixed with "add", the attribute will be included and the attribute/value (tag/value) pair follows in the next line. If prefixed with "delete" the entire attribute will be deleted. If prefixed with "replace", the attribute (tag) is replaced with the new value (equivalent to a "delete" then an "add").
-
delete - The entry (object) is to be deleted.
-
modrdn - The entry’s relative distinguished name has changed (with checked "Create MODRDN" in section "The Other Attributes Area" above).
If „All tags in Modify-Record“ in section "The Other Attributes Area" above is checked then the changetype:modify record does not follow the LDIF change format rules but looks like an changetype:add record with tag/value pairs:
DN:HPC=80338,PNO=00001995,SN=Schmidt
CHANGETYPE: MODIFY
ADRBEG:2005/10/28
ADREND:2005/10/31
BD:1944/08/12
GN:Hans-Peter
HPA:München
HPC:81200
HSTA:Franz-Josef-Strauß-Str. 1
O:IDES AG
OU:Sales Office 1000 Frankfurt
PAREA:Frankfurt
PNO:00001995
SN:Schmidt
Here is an example of SAPAgent LDIF content format:
version: 1
dn: GN=Dieter, PNO=00000002, SN=Meyer\\Walter
BD: 1954/10/31
BLD:
CN:
COM:
EXT:
FTN:
GN: Dieter
HPA: Frankfurt,Main
HPC: 60318
HSTA: An der großen Brücke 5
HTN:
I:
Here is an example of SAPAgent LDIF change format:
version: 1
dn: GN=Dieter, PNO=00000002, SN=Meyer\\Walter
changetype: modify
delete:HPA
-
delete:HPC
-
delete:HSTA
-

dn: GN=Dieter, PNO=00000002, SN=Meyer\\Walter
changetype: delete
-
Logging
SAPAgent logs the following master information for every activity:
-
Unique Key
-
Activity
-
Date/time-stamp
-
Executing User-Id
SAPAgent logs the following information for export operations:
-
Success
-
Filename
-
Selection criteria
-
Number of records affected, type of affection
-
Number of records in error
Use the Show Log Information selection in the Extras menu to display log information. SAPAgent displays the Log view dialog:
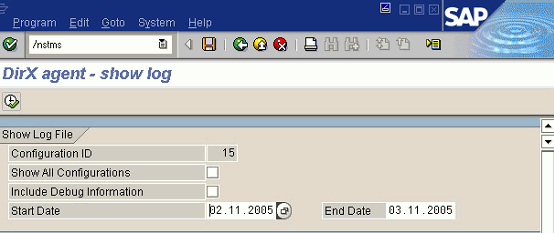
The Log view dialog box contains the following fields:
Show all configurations - By default, SAPAgent displays log information from the currently selected configuration. Check this field to display log information from all configurations.
Include Debug Information - By default, SAPAgent displays log information about normal operation. Check this field to include advanced information about SAPAgent internal processing in the log file display. This information can be helpful during the evaluation of error situations.
Start Date and End Date - Use the Start Date and End Date fields to display log information that was generated during a specific period of time.
Click the Execute button or press F8 in the Log View dialog to generate a log file display. Here is an example of a log file display:
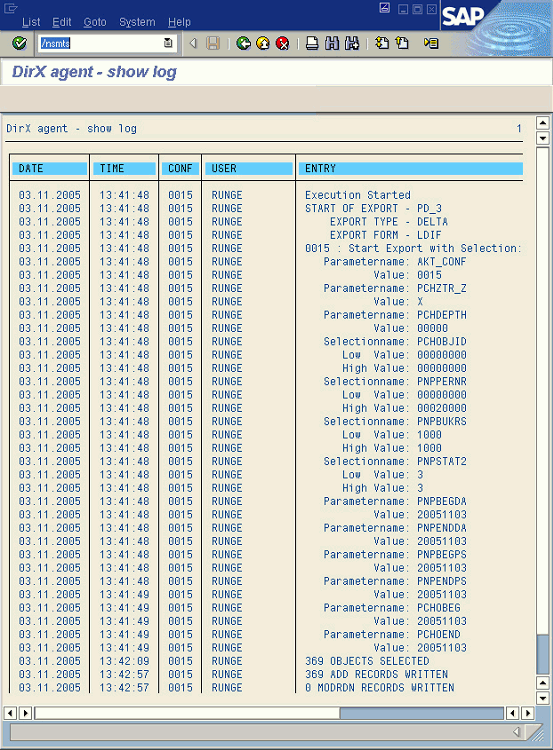
To delete log file entries up to a specified date:
-
In the Extras menu, select Delete Log Information. The Delete Log entries dialog appears.
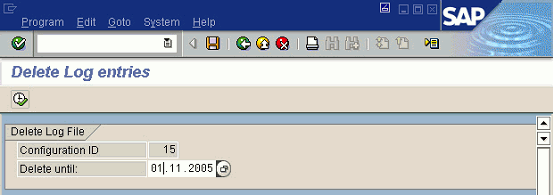
-
In Delete until, select the date before which all log file entries are to be deleted.
Manually Inspecting and Maintaining Attributes
The SAP Agent saves customizing (and other items) in the table /SIE/DIRXAGCONFA. The agent typically maintains this table automatically in the background. However, during problem analysis it is helpful to inspect or even modify entries manually. Report /SIE/DIRXAG_ATTRIBUTES is intended for such situations. Here are some examples.
View attributes with names starting with F of interface 3:
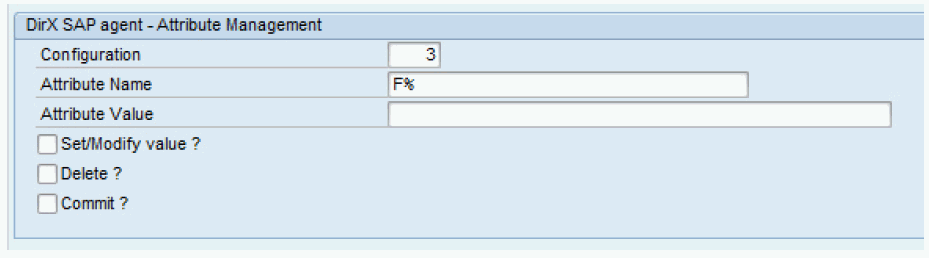
Here is the sample output:
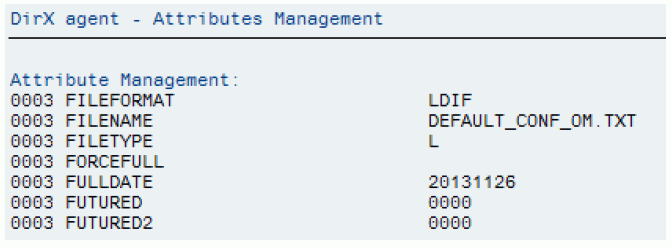
View all attributes:
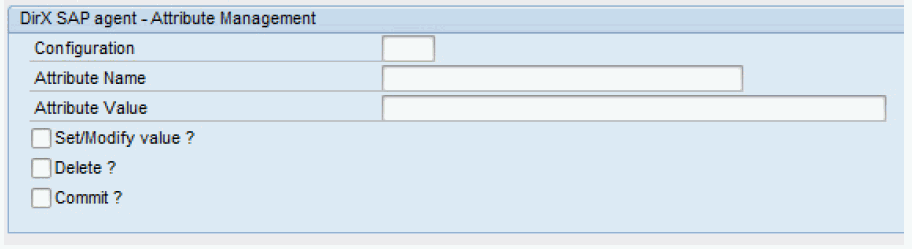
Set the value of an existing attribute or create a new attribute in interface 3 in test mode (no commit):
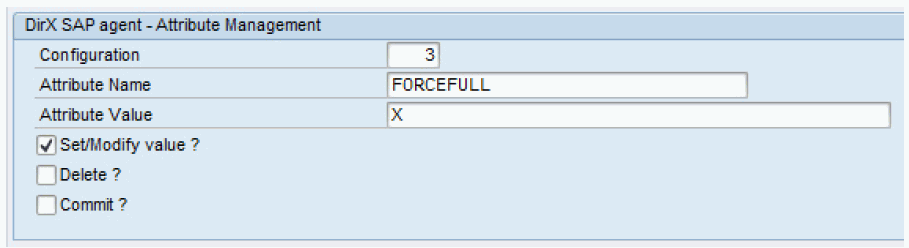
Here is the sample output:
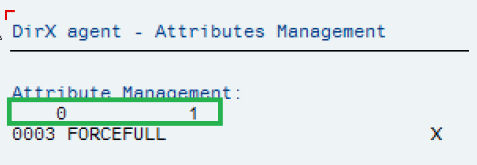
A status line with two numbers is output for all operations that modify data. The first number indicates the execution result, with 0 indicating success and any other value indicating a problem. The second number indicates the number of related records, usually 1. The resulting record(s) are listed after the status line.
Set the value of an existing attribute or create a new attribute in interface 3 in real mode (with commit to the database):
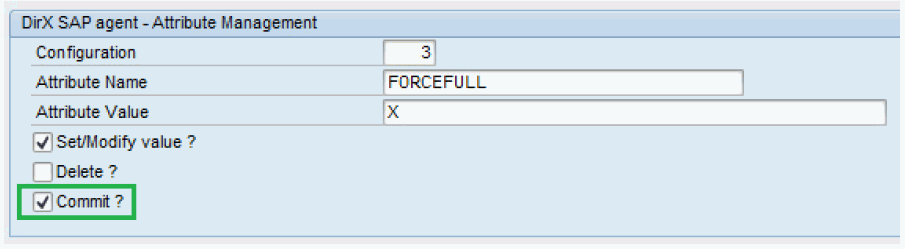
Here is the sample output:
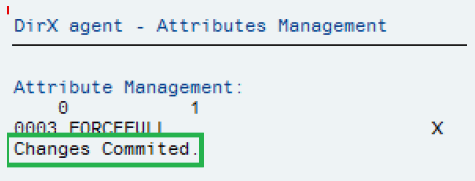
Delete an existing entry:
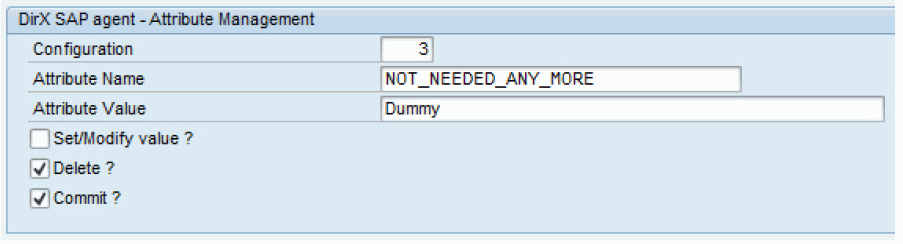
Here is the sample output:
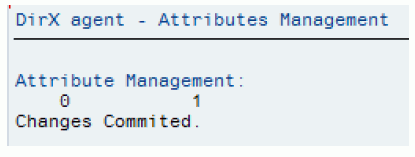
If the above deletion run were to be repeated, the result would be:
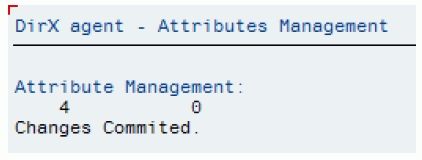
Because no matching entry to be deleted could be found (the first number 4 indicates an error; the second number 0 indicates no records were changed.
Extra care should be taken when using this tool. Also note that changes applied by this tool are not recorded in a customizing transport.