Configuring DirX Identity
This chapter explains how to configure DirX Identity across all supported platforms using the Configuration Wizard. The wizard provides a guided process for initial setup, upgrades, reconfiguration, and unconfiguration.
Configuration Wizard
The Configuration Wizard is a Java Swing application that guides you through configuring DirX Identity components.
Purpose
You can use the wizard to:
-
Perform an initial configuration (automatically launched after Windows installation).
-
Apply upgrade configuration after an update.
-
Reconfigure settings at any time (e.g., create a new domain, modify values).
-
Unconfigure components during uninstallation or on request.
Scripts
-
Configuration:
Configuration.bat(Windows),Configuration.sh(Linux) -
Unconfigure:
UnConfiguration.bat(Windows),UnConfiguration.sh(Linux) -
Initial configuration:
InitialConfiguration.bat(Windows),InitialConfiguration.sh(Linux) - since version 9.0.0, these act the same as Configuration scripts
Before You Start
DirX Directory
DirX Directory is required for DirX Identity to work. Ensure that DirX Directory service is running.
FQDN configuration
The Deployment Tool requires FQDN to be setup properly. The FQDN set in the system has to match the FQDN (host name) you want to set for the components during configuration, otherwise they will not be configured. It will probably result in Deployment Tool not running some tasks (maybe none at all).
Windows
On Windows operating system, check the FQDN configuration:
-
Run Registry Editor system application
-
Search for key
HKEY_LOCAL_MACHINE\SYSTEM\CurrentControlSet\Services\Tcpip\Parameters -
Ensure values named
HostnameandDomainhave data set. The FQDN is constructed by joining these two values with a dot (Hostname.Domain), e.g. with hostnamemy-serverand domainmy.domain.net, the FQDN will bemy-server.my.domain.net.
Linux
On Linux operating system, check the FQDN configuration:
-
Run
hostname --fqdn. -
Ensure it returns a valid FQDN (not
localhost). -
If incorrect, edit
/etc/hostsso the first entry for 127.0.0.1 or ::1 is the valid FQDN.
|
If you cannot set up the FQDN as described above, you may override the native way of obtaining it. For Configuration Wizard, set a property in the properties file named deploymentTool.fqdnOverride=<FQDN>, where <FQDN> is the desired FQDN value.For Deployment Tool, use the command-line argument --fqdn-override=<FQDN>.Remember that this needs to be setup every time you run these programs. It’s recommended to fix the FQDN properly in the operating system instead. |
Starting the Configuration Wizard
You can start the wizard using:
-
Scripts listed above
-
Windows Start Menu shortcut: Start → DirX Identity → Configuration Wizard
|
Windows
For Windows 7 (Vista), Windows 2008 and later, UAC may block registry writes. To avoid issues:
|
|
Linux
Superuser permissions are usually required. If conditions in "Determining the Account for Configuration on UNIX" are met, you can use the installation account. |
|
Linux
Older Linux environments sometimes required setting: |
Properties file
The wizard stores configuration properties in an .ini file. Default path: <DXI_INSTALL_PATH>/configuration.ini (see Commands and Arguments for details)
Property Types
Type |
Description |
String |
Standard text value |
Boolean |
|
FQDN |
Fully Qualified Domain Name (e.g., |
Path |
File system path |
Port |
Integer port number |
Version |
Semantic version (major.minor.patch) |
LDAP DN |
Distinguished Name (escape '=' as '\=') |
Credentials |
Username and password (KeePass only) |
Password |
Deprecated (use Credentials) |
PIN |
Deprecated (use Credentials) |
Size |
Memory/disk size (e.g., |
During normal Configuration:
-
If you want to quit early, you will be asked if you want to save the changes made so far to this file. See more in Navigation and UI.
Password Policies
In some steps, password fields require a certain level of strength before you can continue. If a password does not meet these requirements (policies), hover over the password field to view the policy.
If you have not yet configured policies, you will be asked to do so in a dialog after clicking Next in Welcome Step. You can also configure these policies in the properties file using the following properties (default values in parentheses):
-
PasswordPolicy.MinPasswordLength(8) - Minimum length of the password -
PasswordPolicy.MaxPasswordLength(64) - Maximum length of the password -
PasswordPolicy.MinUpperCaseCharacters(1) - Minimum number of uppercase characters required -
PasswordPolicy.MinLowerCaseCharacters(1) - Minimum number of lowercase characters required -
PasswordPolicy.MinNumericCharacters(1) - Minimum number of numeric characters required -
PasswordPolicy.MinSpecialCharacters(1) - Minimum number of special characters required
|
Validation rules:
If invalid configuration is detected, the error is logged and the application quits. |
| These password policy properties apply only to the Configuration Wizard and are not stored in the DirX Identity configuration. |
Installed and Configured Components
After installation, you may find properties with the prefix: InstalledComponents.
These indicate which components were installed and help determine what should be configured.
After initial configuration, properties with the prefix: ConfiguredComponents.
show which components have already been configured.
| Do not modify or delete these properties manually. They may be used by other parts of DirX Identity. |
| Password policy validation is not performed on existing accounts during re-configuration. |
Default Credentials File
Default credentials are stored in: <DXI_INSTALL_PATH>/deployment/default/dxi-credentials.kdbx.
Protected by:
-
Master password (in
dxi-resource) -
Key file (
dxi-credentials.keyx)
| If the wizard detects the default credentials file, it becomes read-only. |
Logging
Each run creates a log file: <DXI_INSTALL_PATH>/logs/ConfigurationWizard_<START_TIMESTAMP>.log. Use this file for troubleshooting or attach it to support tickets.
All the log settings are defined in the file <DXI_INSTALL_PATH>/bin/deployment/confwizard/conf/logback.xml, but you should not have a need to modify it.
Commands and Arguments
Supported commands:
-
configure– Starts configuration mode (default) -
unconfigure– Starts unconfiguration mode
Example for configure:
Windows: <DXI_INSTALL_PATH>\bin\Configuration.bat
Linux:   <DXI_INSTALL_PATH>/bin/Configuration.sh
| The Initial Configuration is run automatically after installation on Windows platforms. |
| If you have integrated the DirX Identity start/stop scripts into the Linux operating system (see the section Integrating Start/Stop Scripts into the Linux Operating System), you must undo these integration actions (see the subsection Undoing the Integration) before uninstalling the product. |
The Configuration Wizard can be started by scripts described above. If needed (mainly for silent configuration), the following arguments can be used:
-
-d, --dxi-installation-path <PATH>- Specifies the path where DirX Identity is installed. If not specified, it is read from the environment variableDIRXIDENTITY_INST_PATH. -
-f, --wizard-description-file <PATH>- Specifies the path to the wizard description file. If not specified, the default file<DXI_INSTALL_PATH>/bin/deployment/confwizard/wizard.xmlis used. It should not be changed. -
-p, --properties-file <PATH>- Specifies the path to the INI properties file. If not specified, the default file<DXI_INSTALL_PATH>/configuration.iniis used. -
-c, --credentials-file <PATH>- Specifies the path to the credentials file. The supported formats are KeePass 2.kdbxfile or properties.inifile (deprecated). Used here. If not specified, the default file is<DXI_INSTALL_PATH>/configuration.ini. -
-m, --master-password <PASSWORD>- Specifies the master password to open the KeePass database file. Not used if the credentials file is a properties.inifile. Applicable only for the silent configuration, it is always requested in normal mode. -
-k, --key-file <PATH>- Specifies the path to the key file.keyor.keyxof the KeePass database. Only to be used if the KeePass database requires it. Not used if the credentials file is a properties.inifile. -
-j, --idsj-properties-file <PATH>- Specifies the path to the Java-based Server properties file. If not specified, the properties file is used. -
-i, --interface <VALUE>- Specifies the interface to run the Configuration in. By default, it is normal. Otherwise, you can use silent for silent configuration - more about it here.
Exit Codes
The Configuration Wizard returns the following exit codes:
-
0- Configuration completed successfully, or canceled by the user without errors (before Deployment Tool execution) -
1- Exception occurred during configuration (before Deployment Tool execution). -
2- Missing or invalid required data in the properties file (mostly during silent configuration). -
3-BackendExceptionoccurred during backend execution (Deployment Tool). The Deployment Tool exit code is not passed through. -
4-ExecutionExceptionorInterruptedExceptionoccurred during backend execution (e.g., process canceled).
| These arguments can only be changed in the scripts and cannot be provided as arguments to the scripts. |
Navigation and UI
The Configuration Wizard is built on the common DirX Java UI framework jDiscover, specifically its Wizard library.
Layout and Navigation
-
Steps are listed on the left panel, in top-to-bottom order. Colors indicate the status of each step.
-
Navigation is sequential; you cannot skip steps because some depend on previous values.
Buttons
-
Next – Moves to the next step (disabled if data is missing or invalid).
-
Previous – Returns to the previous step (data is preserved).
-
Finish – Enabled only when all steps are complete; ends the configuration process.
-
Cancel – Aborts configuration at any time. If clicked (or the window is closed), a confirmation dialog appears with:
-
Exit with save – Saves changes made so far and exits.
-
Exit without save – Discards changes and exits.
-
Continue – Closes the dialog and resumes configuration.
-
-
Help – Opens relevant documentation in a browser.
Steps Overview
Welcome Step
This is the first step of the Configuration Wizard. Here you specify the credentials file used for passwords.
Inputs:
-
Credentials file path Path to the credentials file. It must exist or be created manually during configuration. Supported formats:
-
*.kdbx– KeePass 2 database file (secure, preferred). For details, visit the Official KeePass website. -
*.ini– Standard INI properties file (not secure).
-
|
The configurator uses version 2.2.4 of the KeePass library because this is the current version of that library as of the time when releasing this DirX Identity version. The mentioned library contains issue with the Sample database, which is automatically created (not the Default Credentials File). See this issue for details. As a workaround:
The issue will be fixed in an upcoming version of the KeePass library. Using such a newer version of that library will be implemented in an upcoming cumulative release of DirX Identity. |
|
For KeePass files:
|
-
Master password Displayed only for KeePass files. Enter the master password for the database.
-
Key file path (optional) Displayed only for KeePass files. Enter the path to the key file (
.keyor.keyx) if required. -
Unlock button Attempts to open the KeePass database with the provided information. Once successful, the button is disabled until another credentials file path is specified.
.ini format is insecure (passwords stored in clear text). It is supported for backward compatibility only.
Default path: <DXI_INSTALL_PATH>/configuration.ini.
Migrate to KeePass as soon as possible.
|
| After proceeding to the next step, the credentials file cannot be changed without restarting the Configuration Wizard. |
Password Policies dialog
If password policies are not yet configured (missing in the properties file), a dialog appears after clicking Next.
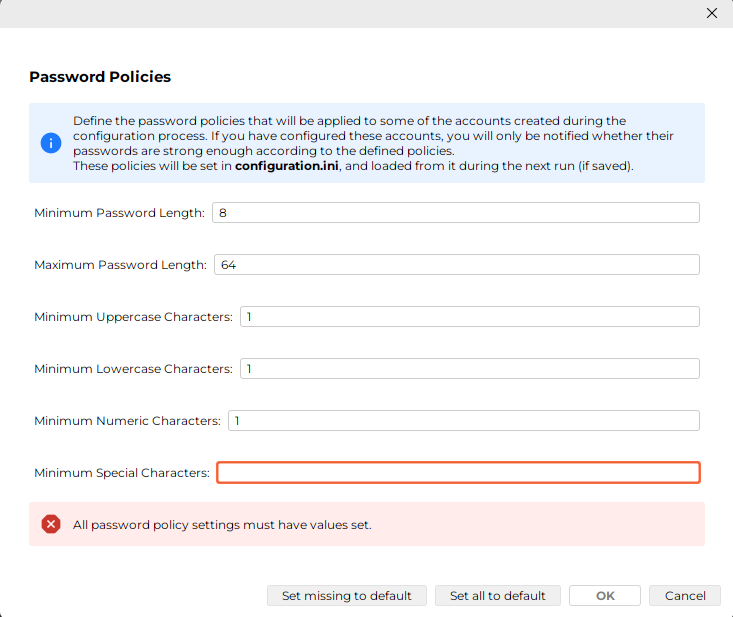
You cannot continue ("OK" button is disabled) until you set valid policies, see Password Policies for details. You can use button "Set missing to default" to fill in default values for any missing policies, or use "Set all to default" to reset all policies to default values.
Configuration Options
This step allows you to select which components should be configured during this run. Each option may add dependent steps automatically, even if those steps are not explicitly selected.
Possible Warning Dialog
At the beginning of this step, you might see the following dialog:

This occurs when the administrator account: cn=admin,dxmC=DirXmetahub could not bind to the Connectivity LDAP server.
The issue is usually caused by:
-
missing or incorrect values in the properties file.
-
DirX Directory service not running.
Check the following properties:
-
connectivityStore.fqdn(connectivityStore.host) -
connectivityStore.port -
connectivityStore.ssl -
hubadmin.credentials -
hubadmin.user(deprecated since 9.0.0, usable only from configuration.ini file, use.credentialsproperty instead) -
hubadmin.password(deprecated since 9.0.0, usable only from configuration.ini file, use.credentialsproperty instead)
How to Proceed
-
If you are performing Initial Configuration, click Continue to proceed. The account does not exist yet and will be created during configuration.
-
For other cases:
-
Click Correct Values… to open a dialog where you can fix the incorrect properties.
-
Check the DirX Directory service, start it if it’s not running.
-
After correcting the values, click Authenticate to retry the LDAP bind.
-
If successful, the "OK" button becomes enabled, allowing you to proceed.
-
Options
| Some of the options may be marked as (MANDATORY). These options are required for the configuration to be successful and cannot be deselected (for example Connectivity and Provisioning configuration during Initial Configuration). |
Available Options
The following options can be selected.
| Selecting an option may automatically add dependent steps, even if those steps are not explicitly chosen. Dependencies are described under each option. |
-
Connectivity Schema and Data
-
Property key:
option.dxm_schema(Boolean) -
Dependant steps: Directory Server for Connectivity, DirX Identity Administrators, System-wide Configuration
-
-
Provisioning Schema and Data
-
Property key:
option.dxr_schema(Boolean) -
Dependant steps: Directory Server for Connectivity, Directory Server for Provisioning, DirX Identity Administrators
-
-
ActiveMQ Message Broker
-
Property key:
option.MessageBroker(Boolean) -
Dependant steps: Directory Server for Connectivity, Directory Server for Provisioning, DirX Identity Administrators, System-wide Configuration, ActiveMQ Message Broker Configuration, ActiveMQ Message Broker Service
-
-
C++-based Server
-
Property key:
option.idsc(Boolean) -
Dependant steps: Directory Server for Connectivity, Directory Server for Provisioning, DirX Identity Administrators, System-wide Configuration, C-based Server Configuration_, _C-based Service, HCL Notes Client (Windows), ODBC and SAP JCO Libraries (Linux)
-
-
Domain
-
Property key:
option.domain(Boolean) -
Dependant steps: Directory Server for Connectivity, Directory Server for Provisioning, DirX Identity Administrators, Domain Configuration
-
-
Java-based Server
-
Property key:
option.idsj_server(Boolean) -
Dependant steps: Directory Server for Connectivity, Directory Server for Provisioning, DirX Identity Administrators, Domain Configuration, System-wide Configuration, Java-based Server Configuration, Java-based Service
-
-
DirX Identity Manager
-
Property key:
option.configureManager(Boolean) -
Dependant steps: Directory Server for Connectivity, Directory Server for Provisioning, DirX Identity Administrators, Domain Configuration
-
-
Web Center, Web Center for Password Management, Provisioning Web Service, Server Admin REST Service, Identity REST Service, Business User Interface
-
Property key (respectively):
option.WebCenter,option.WebCenterPwdMgmt,option.ProvisioningWebService,option.ServerAdminRestService,option.RESTService,option.BusinessUserInterface(Boolean) -
Dependant steps: Directory Server for Provisioning, Domain Configuration, Tomcat Configuration
-
Directory Server for Connectivity
LDAP Server Configuration
FQDN
Property key: connectivityStore.fqdn (connectivityStore.host) (FQDN)
Default value: resolved localhost
The FQDN (fully qualified domain name) of the directory server where the Connectivity database resides.
Port
Property key: connectivityStore.port (Port)
Default value: 389 (non-SSL), 636 (SSL)
The port number of the directory server where the Connectivity database resides.
SSL
Property key: connectivityStore.ssl (Boolean)
Default value: false
Switch controlling if you want to connect with SSL (checked) to the directory server where the Connectivity database resides. Make sure you have entered the appropriate port.
Administrator account
This is the account that has rights to make changes to the directory server schema. During Initial Configuration, this account does not exist yet, and it will be created. It must meet the password policies set. During next runs, it exists, and therefore you must enter the correct password and press Authenticate to verify the credentials.
Property key: connectivityStore.credentials (Credentials)
Default value: in the default passwords KeePass database.
Username
Property key: connectivityStore.user (LDAP DN) (deprecated since 9.0.0, usable only from configuration.ini file, use .credentials property with KeePass database instead)
Default value: cn=admin,o=My-Company (of My-Company domain)
The name (LDAP DN). The password of the default user cannot be changed).
Password
Property key: connectivityStore.password (Password) (deprecated since 9.0.0, usable only from configuration.ini file, use .credentials property with KeePass database instead)
Default value: in the default passwords KeePass database.
The password of the administrator.
DirX Directory
This is the application for the LDAP server. Only DirX Directory is supported.
Installation Path
Property key: connectivityStore.directory_inst_path (Path)
Default value: resolved from environment variable DIRX_INST_PATH or Windows registry.
The path to the DirX Directory installation folder. The path is validated based on the contents of the folder.
Version
Property key: connectivityStore.version (Version)
Default value: resolved from installation path.
This property is read-only. It is resolved when the installation path changes, either from one of its programs, or from the registry on Windows.
Build
Property key: connectivityStore.build (Version)
Default value: resolved from installation path.
This property is read-only. It is resolved when the installation path changes, either from one of its programs, or from the registry on Windows.
If you are using SSL for the first time to bind to the directory server with the Configurator, you must import the test CA certificate of the LDAP server into the trust store <DXI_JAVA_HOME>/lib/security/cacerts of the JRE for DirX Identity before you run the Configuration Wizard. (See the chapter "Setting up the Java-based Configuration Wizard" in the DirX Identity Connectivity Administration Guide for details.) If DirX Identity was not installed before, and you cannot use the DirX Identity Manager to import certificates into trust stores, then you must use <DXI_JAVA_HOME>/bin/keytool.exe to import the certificate.
|
DirX Directory Server for Provisioning
This step is the same as the step Directory Server for Connectivity described above, but it is used to configure the directory server where the Provisioning database resides. Additionally, the default values may be resolved from the Connectivity configuration.
It uses the following property keys (see the mentioned step for details):
-
provisioningStore.fqdn(provisioningStore.host) -
provisioningStore.port -
provisioningStore.ssl -
provisioningStore.credentials -
provisioningStore.user(deprecated since 9.0.0, usable only from configuration.ini file, use.credentialsproperty with KeePass database instead) -
provisioningStore.password(deprecated since 9.0.0, usable only from configuration.ini file, use.credentialsproperty with KeePass database instead) -
provisioningStore.directory_inst_path -
provisioningStore.version -
provisioningStore.build
DirX Identity Administrators
This step manages the three main DirX Identity administrator accounts.
Purpose
-
During Initial Configuration, these accounts do not exist yet. They will be created and stored in LDAP.
-
In subsequent runs, these accounts already exist. You must enter the correct passwords and click Authenticate to verify credentials.
| All passwords must comply with the configured password policy (see Properties file for details). |
Administrator cn=admin,dxmC=DirXmetahub
This account is used to access the DirX Identity Connectivity configuration during Configuration Wizard runs.
Property key: hubadmin.credentials (Credentials)
Default value: in the default passwords KeePass database.
Username
Property key: hubadmin.user (LDAP DN) (deprecated since 9.0.0, usable only from configuration.ini file, use .credentials property with KeePass database instead)
Default value: cn=admin,dxmC=DirXmetahub
This property is read-only and cannot be changed.
Password
Property key: hubadmin.password (Password) (deprecated since 9.0.0, usable only from configuration.ini file, use .credentials property with KeePass database instead)
Default value: in the default passwords KeePass database.
The password of the administrator.
Administrator cn=server_admin,dxmC=DirXmetahub
This account is used by DirX Identity C++-based Server and the supervisor to access the Connectivity configuration.
Property key: svcadmin.credentials (Credentials)
Default value: in the default passwords KeePass database.
Username
Property key: svcadmin.user (LDAP DN) (deprecated since 9.0.0, usable only from configuration.ini file, use .credentials property with KeePass database instead)
Default value: cn=server_admin,dxmC=DirXmetahub
This property is read-only and cannot be changed.
Password
Property key: svcadmin.password (Password) (deprecated since 9.0.0, usable only from configuration.ini file, use .credentials property with KeePass database instead)
Default value: in the default passwords KeePass database.
The password of the administrator.
Administrator cn=SystemDomain,cn=DirXmetaRole-SystemDomain
This account is used as supervisor for the Provisioning configuration.
Property key: roleadmin.credentials (Credentials)
Default value: in the default passwords KeePass database.
Username
Property key: roleadmin.user (LDAP DN) (deprecated since 9.0.0, usable only from configuration.ini file, use .credentials property with KeePass database instead)
Default value: cn=SystemDomain,cn=DirXmetaRole-SystemDomain
This property is read-only and cannot be changed.
Password
Property key: roleadmin.password (Password) (deprecated since 9.0.0, usable only from configuration.ini file, use .credentials property with KeePass database instead)
Default value: in the default passwords KeePass database.
The password of the administrator.
ActiveMQ Message Broker Configuration
This step allows you to configure the Message Broker Configuration, which is based on Apache ActiveMQ.
FQDN
Property key: MessageBroker.fqdn (MessageBroker.host) (FQDN)
Default value: resolved localhost
The FQDN of the system this server runs on. If SSL is used or planned to be used for the system, specify the host name in the same form - short or fully-qualified - as for generating the server certificate for this host. In a wide area network a fully-qualified host name could be required for SSL to work properly.
Display Name
Property key: MessageBroker.displayname (String)
Default value: Message Broker 1
This property is read-only in format Message Broker n, where n is the number of Message Brokers configured for your (possibly distributed) installation, incremented by one for a new one. It is either the display name of an existing Message Broker or a new Broker name.
Port
Property key: MessageBroker.port (Port)
Default value: 61616
The port for message transfer.
Secure Port
Property key: MessageBroker.secure_port (Port)
Default value: 61617
The port for secure message transfer.
Admin (Web Console) Port
Property key: MessageBroker.admin_port (Port)
Default value: 8161
The port for accessing the ActiveMQ Web Console.
You can access the Web Console after configuration at the URL http://<HOST_NAME>:<ADMIN_PORT>/admin, e.g. http://localhost:8161/admin.
JMX Port
Property key: MessageBroker.jmx_port (Port)
Default value: 10098
The port for the JMX monitoring (n). Note that the port (n+1) is also configured and used.
Message repository
Property key: MessageBroker.repository (Path)
Default value: <DXI_INSTALL_PATH>/messagebroker/data/kahadb
The path to the message repository (KahaDB). It must be specified as an absolute path. Alternatively, on a Windows system, you can specify it as a UNC path referring to a shared folder.
ActiveMQ Message Broker Service Account
This step allows you to configure the ActiveMQ Message Broker service. It offers similar configuration as in the Windows Services app, with Linux lacking some parts.
The Configurator asks under which account the ActiveMQ Message-Broker service should run.
Log on as account (Windows only)
You can choose from:
-
System account option (default)
-
This (Custom) account option, where you can enter your preferred account. The following properties can be set:
-
Domain
-
Property key:
MessageBroker-service.domain(String) -
The domain can be left empty to use the local computer
-
-
Credentials
-
Property key:
MessageBroker-service.credentials(Credentials)
-
-
User
-
Property key:
MessageBroker-service.account(String) (deprecated since 9.0.0, usable only from configuration.ini file, use.credentialsproperty with KeePass database instead)
-
-
Password
-
Property key:
MessageBroker-service.password(Password) (deprecated since 9.0.0, usable only from configuration.ini file, use.credentialsproperty with KeePass database instead)
-
-
To use the System account in silent configuration, leave all the above properties empty.
Startup type
Property key: MessageBroker.start_type_automatic (Boolean)
Default value: true (Automatic)
The dropdown corresponds to the startup type of the Windows service, but it is used on Linux too. The options are:
-
Automatic (Delayed Start)
-
Automatic
-
Manual
-
Disabled
You cannot select Automatic (Delayed Start) nor Disabled. For compatibility, the property is a Boolean, where true means Automatic and false means Manual.
Start service after configuration
Property key: MessageBroker.start_after_configuration (Boolean)
Default value: true (checked)
If checked, the service is attempted to be started after Configuration Wizard (Deployment Tool) finishes.
After pressing Next, the specified account is checked for validity and the rights to create files in the directory <DXI_INSTALL_PATH>. To perform these checks, the account under which this configuration procedure runs (the account you are logged in) must have the advanced user rights "Act as part of the operating system" and "Replace a process level token". If this is not the case, error is displayed. We recommend aborting the configuration at that point and performing this procedure:
-
Cancel the configuration.
-
Grant the required rights to the user.
-
Reboot your computer.
-
Run the DirX Identity Configurator again.
Service name
Property key: MessageBroker.servicename (String)
Default value: hardcoded based on the OS
| This property appears in the properties file, but it is not configurable. Do not change it manually. |
Executable path
Property key: MessageBroker-service.executable_path (Path)
Default value: hardcoded based on the OS
| This property appears in the properties file, but it is not configurable. Do not change it manually. |
C++-based Server Configuration
This step allows you to configure the DirX Identity C++-based Server.
Primary DirX Identity C Server.
Property key: IdS-C.primary (Boolean)
Default value: true
This checkbox is displayed only if you are configuring a C Server on a machine different from the one hosting the Connectivity Database.
-
When to check the box: Select this option if you want to configure the primary C Server for this host name.
-
When not checked: If the box remains unchecked, the system will configure a secondary C Server for this host name.
|
When reconfiguring an existing primary or secondary C Server:
|
FQDN
Property key: IdS-C.fqdn (IdS-C.host) (FQDN)
Default value: resolved localhost
The FQDN of the system this server runs on. If SSL is used or planned to be used for the system, specify the host name in the same form - short or fully-qualified - as for generating the server certificate for this host.
Port for key transfer
Property key: IdS-C.port (Port)
Default value: 1111
The port for secure connections between the DirX Identity C++-based server and the DirX Identity Java-based agents if encryption mode is to be used.
Work path
Property key: path.work (Path)
Default value: <DXI_INSTALL_PATH>/work
The path to a directory, which will be used to store the files during a run of an activity. It must be specified as an absolute path. Alternatively, on a Windows system, you can specify it as a UNC path referring to a shared folder.
Status path
Property key: path.status (Path)
Default value: <DXI_INSTALL_PATH>/status
The path to a directory, which will be used to store the permanent files during a run of an activity. It must be specified as an absolute path. Alternatively, on a Windows system, you can specify it as a UNC path referring to a shared folder.
The Configurator asks you to select a work path directory and a status path directory. It displays the default locations in the fields provided.
| We recommend setting the work and status paths on separate disks in production environments. DirX Identity is designed to ignore a full status area disk, but cannot ignore a full disk where the work area is located. |
C++-based Service Account
This step is the same as the step ActiveMQ Message Broker Service Account described above, but it is used to configure the DirX Identity C++-based Server service.
It uses the following property keys (see the mentioned step for details):
-
IdS-C-service.domain -
IdS-C-service.credentials -
IdS-C.start_type_automatic -
IdS-C.start_after_configuration -
IdS-C-service.account(deprecated since 9.0.0, usable only from configuration.ini file, use.credentialsproperty with KeePass database instead) -
IdS-C-service.password(deprecated since 9.0.0, usable only from configuration.ini file, use.credentialsproperty with KeePass database instead) -
IdS-C-service.name(not configurable, do not change manually) -
IdS-C-service.executable_path(not configurable, do not change manually)
Domain Configuration
This step allows you to configure your domain. It offers two options:
-
Customer Domain (default)
-
Property key:
option.cust_domain(Boolean)
-
-
Sample Domain
-
Property key:
option.sample_domain(Boolean)
-
You can configure any number of customer domains, but only one at a time. If you want to configure another customer domain, you must run the Configuration Wizard again.
| The sample domain is a complete and fully working example of a domain named My-Company. For more information, see the DirX Identity Tutorial Guide. |
Domain
Name
Property key: domain (String)
Default value: My-Company (of sample domain) or empty (of customer domain)
The name of the domain. Characters dollar sign ($), asterisk (*), question mark (?), hash sign (#), comma (,), plus sign (+) and equals sign (=) are not allowed.
Technical name
Property key: tech_customer_domain (String)
Default value: suggested based on the domain name.
You can change the suggested technical name if needed. This name is used for:
-
Creating the folder:
<DXI_INSTALL_PATH>/idsj-technical_domain-SnThis folder corresponds to the n-th Java-based Server for the specified domain. -
Generating service names related to Java-based Servers for that domain.
|
For technical reasons, the name must follow strict rules:
|
Administrator cn=DomainAdmin,cn={DOMAIN}
This account has full control over the customer domain tree.
Property key: domainadmin.credentials (Credentials)
Default value: in the default passwords KeePass database
Username
Property key: domainadmin.user (LDAP DN) (deprecated since 9.0.0, usable only from configuration.ini file, use .credentials property with KeePass database instead)
Default value: cn=DomainAdmin,cn={DOMAIN} (cn=DomainAdmin,cn=My-Company for the sample domain).
This property is read-only and cannot be changed manually. The {DOMAIN} is replaced by the provided domain name.
Password
Property key: domainadmin.password (Password) (deprecated since 9.0.0, usable only from configuration.ini file, use .credentials property with KeePass database instead)
Default value: in the default passwords KeePass database (for the sample domain).
The password of the administrator. If the domain does not yet exist in the directory, it will be stored in the LDAP for future logins.
System-wide Configuration
This dialog is only displayed when either ActiveMQ Message Broker or Java-based Server or C++-based Server is selected.
Activate High Availability
Property key: systemwide.ha (Boolean)
Default value: false (unchecked)
Activate the High Availability functionality system-wide, which is selectable only if the HA license is installed. The Directory Server for Connectivity step must also be selected for this option to be available.
Use SSL
Property key: systemwide.ssl (Boolean)
Default value: false (unchecked)
Use SSL for all connections to the ActiveMQ Messaging Server(s) and to the Java Servers running in the system. The Directory Server for Connectivity step must also be selected for this option to be available.
|
SSL cannot be set on new installations because some certificate and keystore- and truststore-generating scripts as described in Securing Identity Server Connections with SSL must be run first. When preparing the above-mentioned scripts for generating certificates and key and trust store, be sure that you specify the local machine name (hostname) the same way - either in the short form or in the fully-qualified name form, which is recommended in a wide area network - as you intend to do in the configuration steps for the ActiveMQ Message Broker, Java-based Server and C++-based Server. They all write the specified hostname into the same Connectivity system object, which must match the name contained in the server certificate for that machine. |
If SSL is selected, the following options are displayed:
Keystore Password
Property key: systemwide.keystore_pwd (Password)
Default value: in the default passwords KeePass database.
The passwords are written to the <DXI_INSTALL_PATH>/ssl/password.properties file. Be sure that you specify the same passwords as you did when generating the store.
If encryption mode is configured at the Connectivity Configuration object or the cn=server_admin,dxmC=DirXmetahub object contains a certificate, the Configurator asks you to set:
Pin
Property key: systemwide.pin (PIN)
Default value: in the default passwords KeePass database.
Used for reading the private key from the server_admin object.
Previous Pin
Property key: systemwide.previous_pin (PIN)
Default value: in the default passwords KeePass database.
Used for reading the previous private key from the server_admin object.
The PINs are written to the <DXI_INSTALL_PATH>*/ssl/password.properties* file. Be sure that you specify the same PINs as you did when generating the certificate and private key for the Connectivity server_admin object with the dirxgenpse tool.
If client signature is configured at the Provisioning Domain object, the Configurator asks you to set:
Signature Pin
Property key: systemwide.signature_pin (PIN)
Default value: in the default passwords KeePass database.
Used for reading the private key from the DomainAdmin user object.
The domain-specific signature PIN is written to the <CURRENT_JAVA_SERVER_FOLDER>/private/password.properties file (if a Java-based Server is also configured in this configuration run). Be sure that you specify the same PIN as you did when generating the certificate and private key for the Provisioning cn=DomainAdmin,cn=<DOMAIN_NAME> object with the dirxgenpse tool.
| The password.properties file is always written in this step, no matter whether ssl, encryption or client signature is set. If one of them is not set and so the Configurator does not ask for the related password or PIN, the default values are written to the password.properties file. |
Java-based Server
This step allows you to configure a DirX Identity Java-based Server to a specific domain, which was set in the Domain Configuration step. You can configure multiple servers per domain.
Server to configure
Property key: NONE
Default value: Java Server whose values are loaded from the properties (Configuration) file
The drop-down list contains three types of entries:
-
CONFIGURATION FILE - There is only a single entry of this type, which is always present and selected by default. It represents the Java-based Server whose values are loaded from the properties file. Used mainly for the silent configuration.
-
LDAP - There can be any number of these entries (also none). They are loaded from the LDAP and filtered for currently selected domain. You can select one of these to reconfigure existing server.
-
NEW - There is only a single entry of this type, which is always present. This should be selected if you want to configure new server in normal configuration mode. Some of the values are calculated automatically based on the existing servers in the LDAP.
| You are not allowed to update a Java-based Server for the domain specified in Domain Configuration if that Java-based Server is already configured for another domain. |
Display name
Property key: IdS-J.server_name
Default value: resolved by the values, described below.
The name consists of the technical domain name, the incremented number based on the amount of servers configured for this domain (n), and the host name the server runs on. The full format is <TECHNICAL_DOMAIN_NAME>-Sn-<FQDN>.
FQDN
Property key: IdS-J.fqdn (IdS-J.host) (FQDN)
Default value: resolved localhost
FQDN of the system on which the Java-based Server runs. If SSL is used or planned to be used for the system, specify the host name in the same form - short or fully-qualified - as for generating the server certificate for this host.
Memory size
Property key: IdS-J.heap_size (Size)
Default value: 2 GByte
The heap size for the Java-based Server. The value must be specified in gigabytes. The total system memory is also displayed in the dialog for reference.
| The specified value should not exceed threshold of 75% of the total system memory. The Configurator checks this and displays a warning if the value exceeds the threshold. |
HTTP(S) Port
Property key: IdS-J.port (Port)
Default value: 40n00, where n is the number of Java-based Servers configured for this domain, incremented by one for a new one, starting from 0.
JMX Port
Property key: IdS-J.jmx_port (Port)
Default value: 40n0m, where n is the number of Java-based Servers configured for this domain, incremented by one for a new one, starting from 0, and m is by default 5.
The port for JMX monitoring. Note that the port (m+1) is also configured and used.
Log folder
Property key: IdS-J.log_path (Path)
Default value: ../logs
The path to the folder where the Java-based Server writes its warning and server logging files. This path is also used for classloading logging and other items.
Java-based Service
This step is the same as the step ActiveMQ Message Broker Service Account described above, but it is used to configure the DirX Identity C++-based Server service.
It uses the following property keys (see the mentioned step for details):
-
IdS-J-service.domain -
IdS-J-service.credentials -
IdS-J.start_type_automatic -
IdS-J.start_after_configuration -
IdS-J-service.account(deprecated since 9.0.0, usable only from configuration.ini file, use.credentialsproperty with KeePass database instead) -
IdS-J-service.password(deprecated since 9.0.0, usable only from configuration.ini file, use.credentialsproperty with KeePass database instead) -
IdS-J-service.name(not configurable, do not change manually) -
IdS-J-service.executable_path_(not configurable, do not change manually)
At the end of this step, the Configuration Wizard always saves a template file containing the Java-based Server properties. The default path to the file is <DXI_INSTALL_PATH>/<IDSJ-DISPLAY-NAME>-configuration.tpl. Here is an example of a template file:
IdS-J.heap_size=2 GByte
IdS-J.host=HOSTNAME
IdS-J.port=40000
IdS-J.jmx_port=40005
IdS-J.protocol=http
IdS-J.log_path=../logs
IdS-J.server_name=My-Company-S1-HOSTNAME
IdS-J.start_after_configuration=1
IdS-J.start_type_automatic=1
IdS-J-service.domain=mydomain
IdS-J-service.account=myaccount
IdS-J-service.password=<PASSWORD>
// for silent configuration only:
domain=My-Company
tech_customer_domain=My-Company
domainadmin.user=cn=DomainAdmin,cn=My-Company
domainadmin.password=<PASSWORD>
You can create these files yourselves to configure several Java-based Servers automatically in silent mode. For this purpose, create one configuration file for each Java-based Server in <DXI_INSTALL_PATH>/deployment/conf/idsj. Then run the wizard for each Java-based Server, specifying the name of the Java-based Server configuration file as the third parameter to the script files, or modifying the relevant variables in those script files. You can also specify the Domain properties in this file, otherwise they will be read from the properties file.
Tomcat Configuration
This step allows you to configure the Web Container Configuration, which is based on Apache Tomcat. You can find the supported versions in the release notes.
|
When upgrading to a new Tomcat version, please install it into the same installation folder as the existing version. The current deployment architecture supports only a single Tomcat instance. Changing the installation folder does not create a new instance; therefore, the web applications will not be redeployed and the new Tomcat version will not be activated. This limitation will be addressed in a future release. If you need to install Tomcat in a different folder, first back up the configuration files from the existing installation directory. After installing the new version, manually copy these configuration files from the backup into the new installation directory and redeploy the web applications accordingly. |
Details for upgrading (external) Apache Tomcat
Sometimes it is necessary to update the external Tomcat because of security reasons.
You can do this, but you should stick on the major Tomcat version, which is for all DXI 9.0 versions Tomcat 11.
In this section it is assumed, that the tomcat is installed in the default directory folder:
C:\Program Files\Apache Software Foundation\Tomcat 11.0.
In the following this folder path is replaced with <tomcat-installation-folder>.
-
Download a new tomcat ‘32-bit/64-bit Windows Service Installer’ from
http://tomcat.apache.org/download-11.cgi (for DXI 9.0) -
Stop the current tomcat service.
-
It would be a good decision to backup the complete folder <tomcat-installation-folder> to a save place. But at least - and this is mandatory - backup the following files and folders to some save place, e.g.
C:\Inst\:-
<tomcat-installation-folder>\conf\Catalina\ -
<tomcat-installation-folder>\dxilib\ -
<tomcat-installation-folder>\conf\server.xml -
any additional changed configuration files inside
<tomcat-installation-folder>\conf\(look at the dates of the files) -
the log files (if you need them) from
<tomcat-installation-folder>\logs
-
-
Uninstall completely the current Tomcat using ‘Control Panel –> Programs and Features’
-
The folder
<tomcat-installation-folder>should now be gone -
Install the new Tomcat with the default configuration. You can deactivate for security reasons the options
DocumentationandManagerwhile installation. -
Stop the tomcat service, if it was started.
-
Copy the folders from the backup back to
<tomcat-installation-folder>\conf\Catalina\
<tomcat-installation-folder>\dxilib\ -
Edit the file
<tomcat-installation-folder>\conf\server.xmland add the changes from the file server.xml from the backup into the new server.xml. Mainly it is the section starting with ‘<Connector port="8443"’ (or some other port you are using). A diff tool e.g. from Notepad++ could be helpful.
Only Windows:
-
Run:
<tomcat-installation-folder>\bin\Tomcat11w.exe -
Switch to the tab ‘Java’ and add the following two lines to ‘Java Options’:
-Dorg.apache.catalina.connector.RECYCLE_FACADES=false
-Dcom.sun.jndi.ldap.object.disableEndpointIdentification=true
(This second line is only neceassary, if your LDAPS (DirX Directory) server certificate does not contain the correct name of the server. If you have a correct name inside the certificate, it should not be necessary to add this line - for security reasons.) -
Add the following extensions to the end of the ‘Java Classpath’:
;<tomcat-installation-folder>\dxilib*;<DXI_INSTALL_PATH>\lib\java\custom\* -
Click on ‘OK’
-
Start the tomcat service
Only Linux:
-
Edit the file:
<tomcat-installation-folder>/bin/catalina.sh
and add below the line
# Control Script for the CATALINA Server
this line:
JAVA_OPTS="$JAVA_OPTS -Dcom.sun.jndi.ldap.object.disableEndpointIdentification=true -Dorg.apache.catalina.connector.RECYCLE_FACADES=false"
(The part-Dcom.sun.jndi.ldap.object.disableEndpointIdentification=trueis only necessary, if your LDAPS (DirX Directory) server certificate does not contain the correct name of the server. If you have a correct name inside the certificate, it should not be necessary to add this line - for security reasons.) -
Start the tomcat service
The web container here will be configured for the domain specified in Domain Configuration, for the web applications and services you have selected in the Options step. These are:
-
DirX Identity Web Center (webCenter)
-
DirX Identity Web Center for Password Management (pwdManagement)
-
DirX Identity Provisioning Web Service (ProvisioningService)
-
DirX Identity REST Service (DirXIdentityRestService)
-
DirX Identity Business User Interface (BusinessUserInterface)
These applications are deployed to the folder <DXI_INSTALL_PATH>/web/instances. Each application is deployed to its own folder, named after the application. The format of the name is <APP_NAME>-<TECHNICAL_DOMAIN_NAME>, where the <APP_NAME> is the name above in the parentheses, and <TECHNICAL_DOMAIN_NAME> is the technical domain name of the currently specified domain. For example, the Web Center for My-Company domain would be deployed to <DXI_INSTALL_PATH>/web/instances/webCenter-My-Company.
| The DirX Identity Web Center can be set up with other Web servers, too. Contact your support group to get more information about configuration with your specific Web server. |
Server Configuration
FQDN
Property key: tomcat.fqdn (tomcat.host) (FQDN)
Default value: resolved localhost
This property is read-only. It shows the FQDN of the system this server runs on.
Port
Property key: NONE
Default value: 8080 (non-SSL), 8443 (SSL)
This property is read-only. It changes dynamically depending on whether system-wide SSL is used or not.
SSL
Property key: NONE
Default value: false (non-SSL), true (SSL)
This property is read-only. It changes dynamically depending on whether system-wide SSL is used or not.
Apache Tomcat
Installation Path
Property key: tomcat.path (Path)
Default value: resolved from environment variable CATALINA_HOME or CATALINA_BASE. Otherwise, on Windows from the registry, and on Linux from several standard paths.
The path to the Apache Tomcat installation folder. The path is validated based on the contents of the folder.
Version
Property key: tomcat.version (Version)
Default value: resolved from scripts in the installation path.
This property is read-only. It is resolved when the installation path changes, either from one of its programs, or from the registry on Windows.
If the version is not supported, an error message is displayed, and you will not be able to continue. You need to install a supported version of Apache Tomcat. See Details for upgrading (external) Apache Tomcat.
Service
Service Name
Property key: tomcat.service_name (String)
Default value: On Windows, Apache Tomcat or Tomcat with the version number appended, for example Tomcat11. On Linux, name of the Tomcat installation folder.
The name of the service.
Executable Path
Property key: tomcat.service_executable_path (Path)
Default value: Resolved based on the installation path.
The path to the Tomcat service application executable file. This file is located in the <TOMCAT_INSTALL_PATH>/bin folder. This field was introduced to allow you to select a different file if you have renamed the service executable file. If you have not renamed it, you should accept the default value.
Windows:
By default, it is named after the service name, the format is <TOMCAT_SERVICE_NAME>.exe, so for the service named Tomcat11, it would be Tomcat11.exe.
Linux:
By default, it is the script <TOMCAT_INSTALL_PATH>/bin/catalina.sh.
For Windows, there is also the Tomcat monitor application executable file in the same folder, which is named after the service name too, but has w appended. For the service named Tomcat11, it would be Tomcat11w.exe. Be sure to select the correct file. You can find more about it here.
|
Start after Configuration
Property key: tomcat.start_after_configuration (Boolean)
Default value: true (checked)
If checked, the service is attempted to be started after Configuration Wizard (Deployment Tool) finishes.
HCL Notes Client
This step is only displayed on Windows platforms when C++-based Server Configuration is selected.
Path
Property key: path.notes (Path)
Default value: C:\HCL\Notes
The path to the HCL Notes Client installation folder. The folder does not need to exist yet, but the path format is validated. You can install the HCL Notes Client after the configuration procedure.
| Reboot the machine after the configuration is completed before using connectivity to the HCL Notes system. |
ODBC Library Path
This step is only displayed on Linux platforms when C++-based Server Configuration is selected.
Path
Property key: path.odbc (Path)
Default value: /opt/odbc/lib
The path to the ODBC library files. The folder does not need to exist yet, but the path format is validated. You can install the ODBC library files after the configuration procedure.
SAP ECC UM Library Paths
This dialog is only displayed on Linux platforms when C++-based Server Configuration is selected.
SAP JCO library path
Property key: path.sap.um (Path)
Default value: /opt/sapjco
The path to the SAP JCO library folder. The folder does not need to exist yet, but the path format is validated. You can install the SAP JCO library file after the configuration procedure.
SAP JCO JAR file
Property key: path.sap.jco (Path)
Default value: /opt/sapjco/sapjco.jar
The path to the SAP JCO JAR file. The file does not need to exist yet, but the path format is validated. You can install the SAP JCO JAR file after the configuration procedure.
Pre-Configuration Summary
This is the last step before the configuration procedure starts. You can review all your inputs here. If everything is correct, click Next to start the configuration procedure.
| Pressing Next starts the configuration procedure immediately. The properties and credentials files are also saved automatically at this point. If you want to change something, press Back to return to the previous steps. |
Configuration in Progress
This step displays the progress of the configuration & deployment procedure. It shows all the tasks that are performed in the order they are performed. Colors indicate the status of each step.
The configuration is performed by the Deployment Tool, which is started in the background. This may take few seconds. The Configuration Wizard monitors its progress and updates the display accordingly. The Tool is started with following command: <DXI_INSTALL_PATH>/bin/dxictl(.sh|.bat) configure -i <PROPERTIES_FILE> -c <CREDENTIALS_FILE> -m <MASTER_PASSWORD> -k <KEY_FILE>. The arguments are the same as described in the Commands and arguments, taken from what you have provided for the Configuration Wizard.
A KeePass database with the passwords used during the configuration will be created with each run - the path is <DXI_INSTALL_PATH>/deployment/conf/lastrequest.kdbx. This database can be used to retrieve the passwords used during the last configuration run. If you have used a KeePass database for credentials, the master password and key file (if any) used to open that database will also be used to create this database. If you have used an INI file for credentials, the default master password (see Default Credentials File) will be used to create this database.
The tasks are the ones described in the Deployment Tasks. Since Deployment Tool supports Persisted State, you may see the following message:

This means that no changes were detected between the current persisted state and the provided configuration file, so no tasks were performed.
Otherwise, the configuration ends when all the steps finish successfully or when one of the steps fails. At that point, the button to view the log file becomes active. Clicking it opens the Deployment Tool log file in the application text editor.
| It’s possible that the Deployment Tool doesn’t calculate the architecture changes correctly, resulting in the message above. The calculation is based on the FQDN of the machine where the Deployment Tool was run, and where it’s to be run. See FQDN configuration for more details. |
You can set property deploymentTool.force=1 in the properties file to force all tasks to be performed again. The property and value is automatically removed from properties file after the run.Use this option as last resort, as it wipes out the persisted state and forces all tasks to be performed again, which may lead to data loss. |
If all steps are performed successfully, you have completely configured DirX Identity.
| Don’t forget to set the correct passwords for all the pre-configured accounts in the DirX Identity database. See Managing Administrative Accounts for details. |
Deployment Tool
The Deployment Tool is a command-line application that performs the actual configuration of DirX Identity based on the provided architecture YAML or configuration INI file. It is used by the Configuration Wizard, but can also be used on its own to integrate into your own deployment processes.
It is located in the folder <DXI_INSTALL_PATH>/bin and is named dxictl.bat on Windows systems and dxictl.sh on Linux systems. See Commands and arguments for the usage. An example call to configure DirX Identity is <DXI_INSTALL_PATH>/bin/dxictl.bat configure -a <ARCHITECTURE_FILE> -c <CREDENTIALS_FILE> -m <MASTER_PASSWORD> -k <KEY_FILE>.
Persisted State
The state of the configuration is persisted in the integrity protected file <DXI_INSTALL_PATH>/deployment/conf/architecture.bin file. This file is created automatically when the Deployment Tool is run for the first time. It is used to keep track of the current state of the deployment, so that subsequent runs can determine which tasks need to be performed.
Every time the Deployment Tool is run with the configure command, it compares the provided architecture YAML or configuration INI file with the persisted state in the architecture.bin file. Based on this comparison, it determines which deployment tasks need to be performed to bring the system to the desired state. This means that if you run the Deployment Tool with unchanged configuration, it will not perform any tasks, as the system is already in the desired state.
Each run is also recorded in integrity protected file <DXI_INSTALL_PATH>/deployment/conf/requests.bin.
Make sure that the architecture.bin file is not deleted or modified manually, as this can lead to inconsistent state and unexpected behavior during subsequent runs of the Deployment Tool.
|
Logging
For each run of the Deployment Tool, a log file is created in the folder <DXI_INSTALL_PATH>/logs, with name pattern Deployment_<START_TIMESTAMP>.log. You can use this log file to troubleshoot any problems that may occur during the configuration process, or attach it to the support ticket if you cannot resolve the problem yourselves. The error is usually at the end of the file.
Commands and arguments
The application has several commands that perform different deployment related tasks. These commands are:
configure
Configures DirX Identity based on the provided architecture YAML or configuration INI file. The configuration INI file option is used when running the Deployment Tool from Configuration Wizard, but can also be used on its own. See Tasks for the possible deployment tasks.
-
-a, --architecture-file <PATH>(required) - Specifies the path to the YAML architecture file. -
-i, --configuration-ini-file <PATH>(required) - Specifies the path to the INI configuration file. This option is exclusive with the-aoption, meaning that you can use either one of them, but not both at the same time. -
-c, --credentials-file <PATH>(required) - Specifies the path to the credentials file. The supported format is KeePass 2.kdbxfile. -
-m, --master-password <PASSWORD>(required) - Specifies the master password to open the KeePass database file. -
-k, --key-file <PATH>- Specifies the path to the key file.keyor.keyxof the KeePass database. Only to be used if the KeePass database requires it. -
-u, --user <USER>(required - Linux only) - Specifies the DirX Identity technical user. -
-g, --group <GROUP>(required - Linux only) - Specifies the DirX Identity technical group. -
-s, --simulate- Runs the configuration in simulation mode, only determining which tasks to run. No changes are made to the system. -
--fqdn-override <FQDN>- Overrides the FQDN of the system where the Deployment Tool is run. This is useful when the FQDN cannot be resolved correctly. See FQDN configuration for more details. -
--force- Forces all tasks to be performed, ignoring the persisted state. Use this option as last resort, as it wipes out the persisted state and forces all tasks to be performed again, which may lead to data loss.
When run from a console, the output will contain a line for each task that is performed, along with its status [ OK ] or [FAIL]. In simulation mode, the output will contain a line for each task that would be performed, along with status [ OK ].
unconfigure
Unconfigures all DirX Identity components from the system.
-
-c, --credentials-file <PATH>(required) - Specifies the path to the credentials file. The supported format is KeePass 2.kdbxfile. -
-m, --master-password <PASSWORD>(required) - Specifies the master password to open the KeePass database file. -
-k, --key-file <PATH>- Specifies the path to the key file.keyor.keyxof the KeePass database. Only to be used if the KeePass database requires it. -
-s, `--simulate- Runs the unconfiguration in simulation mode, only determining which tasks to run. No changes are made to the system. -
--fqdn-override <FQDN>- Overrides the FQDN of the system where the Deployment Tool is run. This is useful when the FQDN cannot be resolved correctly. See FQDN configuration for more details.
export
Exports the persisted architecture from the system to a YAML architecture file.
-
-a, --architecture-file <PATH>(required) - Specifies the path to the YAML architecture file to export to.
start
Attempts to start all DirX Identity services on the system. Skips services that are already running.
-
-n, --names <SERVICE_NAMES>- Specifies the names of the services to start, separated by spaces. If not specified, all services are started.
stop
Attempts to stop all running DirX Identity services on the system. Skips services that are not running.
-
-n, --names <SERVICE_NAMES>- Specifies the names of the services to stop, separated by spaces. If not specified, all running services are stopped.
General options
There are additionally some global options that can be used with any command:
-
-h, --help- Displays help about the application or a specific command. -
-V, --version- Displays the version of the Deployment Tool. -
-I, --indent<NUMBER>` - Specifies the number of spaces to use for indentation in the console, default is 0.
Exit Codes
The Deployment Tool returns the following exit codes:
-
0- Success -
1- General error -
2-DeploymentExceptionoccurred -
-2- Missing argument-c(Credentials file) -
-3- Missing argument-m(Master password) -
-4- Missing argument-a(Architecture file)
Tasks
Stop Services Task
Stops all running DirX Identity services on the system. Skips services that are not running. The task is performed even if no services are running, to make sure that all services are stopped before the configuration procedure starts.
Connectivity Schema Task
The schema is installed by running command <DXI_INSTALL_PATH>/deployment/schema/dirx-ee/dirxadm SchemaTool.adm (dxmEEdirxadm on Linux) against the local LDAP DirX Directory server.
The files with prefix dirxabbr- are copied from <DXI_INSTALL_PATH>/deployment/schema/role-dirx/SystemDomain and <DXI_INSTALL_PATH>/client/conf to the <DXD_INSTALL_PATH>/client/conf folder in the local DirX Directory installation. The file dirxcl.cfg is copied in opposite direction. File dirxabbr-ext.DirXmetahub.Admin is deleted in the Directory folder.
Connectivity Data Task
Imports the archive <DXI_INSTALL_PATH>/deployment/factory-data/dirx-identity-conn-<VERSION>.l2fs into the local LDAP DirX Directory server using the LDAP2FS tool. This archive contains the initial data for the Connectivity system domain.
The Configuration Objects of dxmC=DirXmetahub are created and modified, including attributes like dxmHAactive for High Availability and dxmSSL for SSL.
Provisioning Schema Task
If Connectivity Schema is not installed, performs the copy of dirxabbr- files as described in Connectivity Schema Task.
Installs schema by running command <DXI_INSTALL_PATH>/deployment/schema/dirx-ee/dirxadm Setup.adm (dxmEEdirxadm on Linux) in working directory <DXI_INSTALL_PATH>/deployment/schema/role-dirx/SystemDomain against the local LDAP DirX Directory server.
Provisioning Customer Domain Task
Installs schema by running command <DXI_INSTALL_PATH>/deployment/schema/dirx-ee/dirxadm Setup.adm (dxmEEdirxadm on Linux) in working directory <DXI_INSTALL_PATH>/deployment/schema/role-dirx/CustomerDomain against the local LDAP DirX Directory server.
Imports the archive <DXI_INSTALL_PATH>/deployment/factory-data/dirx-identity-prov-<VERSION>.l2fs into the local LDAP DirX Directory server using the LDAP2FS tool. This archive contains the initial data for Provisioning of the customer domain.
If Password Management is licensed, imports the archive <DXI_INSTALL_PATH>/deployment/factory-data/dirx-identity-prov-pwmgmt-<VERSION>.l2fs into the local LDAP DirX Directory server using the LDAP2FS tool. This archive contains the initial data for Password Management of the customer domain.
At last, some domain objects are modified, domain admin is added and licenses are updated.
Provisioning Sample Domain Task
Performs the same actions as described in Provisioning Customer Domain Task, but for the sample domain only. Additionally, agent schema is installed.
Provisioning System Domain Task
Imports the archive <DXI_INSTALL_PATH>/deployment/factory-data/dirx-identity-prov-system-<VERSION>.l2fs into the local LDAP DirX Directory server using the LDAP2FS tool. This archive contains the initial data for Provisioning of the system domain.
The Configuration Objects of dxmC=DirXmetahub and cn=DirXmetaRole-SystemDomain are modified.
Message Broker Task
Templates the folder <DXI_INSTALL_PATH>/messagebroker.template to <DXI_INSTALL_PATH>/messagebroker, customizing the configuration files based on the provided architecture.
Updates System and Service (with ports) entries in LDAP, and created the entry for the Message Broker in the Connectivity Configuration Object.
Message Broker Service Task
Creates and customizes the service start/stop scripts in *<DXI_INSTALL_PATH>/etc/ (Linux) or Windows Service (Windows) for the DirX Identity Message Broker component. If Custom account is selected, the service is created to run under the specified account (Windows only).
IdS-C Task
Writes the TCL property files basic.input.tcl and components.input.tcl to the folder _<DXI_INSTALL_PATH>/, customizing them based on the provided architecture.
Templates the file _<DXI_INSTALL_PATH>/server/conf/dxmmsssvr.ini.
On Windows, sets HCL Notes path into Registry. On Linux, templates ODBC and SAP ECC UM library scripts.
IdS-C Service Task
On Windows, installs the service <DXI_INSTALL_PATH>/bin/dxmsvr.exe, with custom account if provided.
On Linux, templates the start/stop script <DXI_INSTALL_PATH>/etc/S99dmsvr.
IdS-C Dependencies Task
Only valid for Windows installations. Installs the required Microsoft Visual C Redistributable packages v9.0 (2008) and v14 (2015+) and PCMX application for the DirX Identity C-based Server component. If applications are installed already, they are not reinstalled.
IdS-J Task
Templates the folder <DXI_INSTALL_PATH>/ids-j.template to <DXI_INSTALL_PATH>/ids-j-<IDSJ_SERVER_NAME>, customizing the configuration files based on the provided architecture.
Updates System and Service (with ports) entries in LDAP, and created the entry for the IdS-J container and entry in the Connectivity Configuration Object.
IdS-J Service Task
On Windows, installs the service <DXI_INSTALL_PATH>/<IDSJ_FOLDER>/ids-j.exe, with custom account if provided.
On Linux, templates the start/stop script <DXI_INSTALL_PATH>/etc/S99dmsvrj.
DirX Identity Manager Task
Creates the file <DXI_INSTALL_PATH>/gui/dxi.cfg, customizing it based on the provided architecture.
Creates the server profiles
-
<DXI_INSTALL_PATH>/gui/profiles/DirXmetahub-<CONN_ID>.serverfor Connectivity, -
<DXI_INSTALL_PATH>/gui/profiles/<DOMAIN_NAME>.serverfor each Provisioning domain, -
<DXI_INSTALL_PATH>/gui/profiles/data.serverfor Provisioning Sample domain.
Web Container Task
The supported web container is Apache Tomcat.
On Windows, updates Java options for Tomcat service in registry and extends its classpath.
On Linux, creates the file <TOMCAT_INSTALL_PATH>/bin/setenv.sh with custom Java options and extends its classpath.
The classpath is extended to include folder <TOMCAT_INSTALL_PATH>/dxilib/ and value of Custom Libraries path.
Web Applications Task
A common task for all web applications and services. Templates the instance into folder <DXI_INSTALL_PATH>/web/instances/<APP_NAME>-<TECHNICAL_DOMAIN_NAME>. Moves endorsed files to the web container. Deploys the web application to the web container.
The web applications are:
-
DirX Identity Web Center
-
DirX Identity Web Center for Password Management
-
DirX Identity Provisioning Web Service
-
DirX Identity REST Service
-
DirX Identity Business User Interface
-
DirX Identity Server Admin REST Service
Start Services Task
Starts the DirX Identity services that were installed and configured on the system, with "Start after Configuration" option set in Configuration Wizard (startNow property in the architecture file). It is expected that no services are running at this point, as they should have been stopped by the Stop Services Task at the beginning of the deployment procedure.
LDAP2FS Tool
The LDAP2FS tool is a command-line application that allows you to export and import LDAP directory data to and from the file system archive. It is located in the folder <DXI_INSTALL_PATH>_/bin, and is named ldap2fs.bat on Windows systems and ldap2fs.sh on Linux systems. See Commands and arguments for usage.
An example call to import a basic archive is <DXI_INSTALL_PATH>/bin/ldap2fs.bat import -f <ARCHIVE_FILE> -H <LDAP_HOST> -p <LDAP_PORT> -D <BIND_DN> -w <BIND_PASSWORD>.
The file system archive file .l2fs is a compressed file that contains the LDAP entries in LDIF format, along with any binary data associated with those entries. The archive can be used for backup purposes, data migration, or for transferring data between different LDAP directory servers.
You can find default archives in the folder <DXI_INSTALL_PATH>/deployment/factory-data.
Commands and arguments
The application has two commands, both with the same set of arguments:
export
Exports LDAP directory data from the LDAP directory to an archive file.
-
-f, --fs-path <PATH>(required) - Specifies the path to the archive file. -
-H, --ldap-host <HOST>- Specifies the LDAP server host. Default is localhost. -
-p, --ldap-port <PORT>- Specifies the LDAP server port. Default is 389. -
-S, --ldaps- Use LDAPS to connect to the LDAP server. Default is not to use LDAPS. -
-D, --bind-dn <DN>- Specifies the bind DN to use for authentication. Default is empty. -
-w, --bind-password <PASSWORD>- Specifies the bind password to use for authentication. Default is empty. -
-F, --settings-file-path <PATH>- Overrides path of settings file. -
-m_, --mode <MODE>- Override mode during import/export with the specified value. The possible values are:-
full- Full import/export of all entries. -
selective- Partial import/export of specified entries only.
-
-
-r, --root-dn<DN> - Override root DN during import/export with the specified value. -
-e, --select_entries<DN1;DN2;…> - Override selected entries during import/export with the specified values, separated by semicolons. -
-s, --select-subtrees<DN1;DN2;…> - Override selected subtrees during import/export with the specified values, separated by semicolons. -
-c, --context-prefix <PREFIX>- Override context prefix (e.g. cn=Domain) during import/export with the specified value. -
-v, --verbose- Print verbose output to stdout. -
-h, --help- Displays help about the application or a specific command. -
-V, --version- Displays the version of the LDAP2FS Tool.
Integrating Start/Stop Scripts into the Linux Operating System
For Linux platforms, the following DirX Identity service components are not necessarily stopped during system shutdown and not necessarily started during system start:
-
Message Broker
-
C++-based Server
-
Java-based Servers
This section describes how to use the DirX Identity integration utility to integrate start and stop scripts for these DirX Identity components into Linux and how to undo the integration if necessary.
Using the Integration Utility
Use the updrcs-linux.sh utility located in <DXI_INSTALL_PATH>/etc to integrate or unintegrate the start/stop scripts created for the listed DirX Identity components in /etc/init.d. The default names for these scripts are:
-
dmsvr for the C++-based Server
-
dmmbrk-number for a DirX Identity Message Broker
-
dmsvrj-technical_domain_name-Snumber for a Java-based Server
It is unlikely but possible that a script with a default name already exists in this folder which does not belong to DirX Identity. The utility automatically detects this kind of naming conflict. In this case, the utility can be customized by modifying the value of the shell variable UNIQUESUFFIX (default: empty string) in order to append a suffix to the default names. To integrate these scripts, perform the Linux command chkconfig -add with the related script names.
The scripts are similar to the scripts dmmbrk-* and S99* in <DXI_INSTALL_PATH>/etc. For instance, the script dmsvr on SuSE platforms is a concatenation of the suitable INIT-V information in <DXI_INSTALL_PATH>/etc/suse/S99dmsvr.txt <DXI_INSTALL_PATH>/etc/S99dmsvr. Here the related placeholders (like @dirx@) are substituted so that they reflect the dependencies correctly. For RedHat platforms, the related file in <DXI_INSTALL_PATH>*/etc/redhat* is used.
The script updrcs-linux.sh uses the technical domain name rather than the original domain name when handling domain-specific components.
For the Message Broker and the Java-based Servers, the script prompts the user to specify whether the related component needs configuration or un-configuration because this cannot be determined from configuration.ini.
Performing the Integration
If the DirX Identity components whose start/stop scripts are to be integrated use a co-located DirX Directory Server installation as the configuration and/or Provisioning store, the following prerequisites must be satisfied:
-
DirX Directory has been configured so that it is started when entering runlevels 3 or 5 and stopped during shutdown. See the DirX Directory documentation for Linux platforms for further details.
For SuSE, this prerequisite means:
-
A start/stop script dirx_script_name for DirX (for example, dirx) must exist in /etc/init.d.
-
The Linux command
chkconfig --list dirx_script_nameis successful.
You must be superuser in order to verify these prerequisites.
If these prerequisites are satisfied, perform these steps:
-
Login as superuser.
-
Using a shell, navigate to <DXI_INSTALL_PATH>*/etc*.
-
Execute the command
./updrcs-linux.sh. For SuSE Linux platforms,dirx_script_namemust be supplied as an input argument if the DirX Identity installation uses a co-located DirX installation. -
The script displays the exit code on screen. An exit code indicates successful execution of the script. A log file updrcs-linux.sh.log is also written.
The integration is now complete. The relevant DirX Identity components are started during system startup (in the order listed in "Integrating Start/Stop Scripts into the Linux Operating System") listed and stopped during system shutdown (in reverse order).
| Running this script is required whenever the configuration has been changed with respect to these DirX Identity components. |
Undoing the Integration
Before uninstalling DirX Identity, the integration must be undone:
-
Log in as superuser.
-
Using a shell, navigate to <DXI_INSTALL_PATH>/etc.
-
Execute the command
./updrcs-linux.sh -cleanupand then check the exit code and the log file.
Silent Mode
The Silent Mode is a way to perform the configuration and un-configuration of DirX Identity without user interaction, which is useful for automated deployments.
Since 9.0, using Deployment Tool is preferred way to perform silent configuration and un-configuration.
The silent mode of the Configuration Wizard is still supported, offering more validation before running the Deployment Tool. See Commands and Arguments for details.
Preparing for Silent Configuration:
-
If you have previously run the Configuration Wizard, backup the Properties file and credentials file from the installation folder.
-
Fill out the Properties file with the desired configuration settings. Select the components to be configured based on properties in the Configuration Options step. You can also run the Configuration Wizard in normal mode to generate the file, exiting with save at the Pre-Configuration Summary step.
-
Create (or copy existing) credentials file, fill out the required credentials for the selected components. The Connectivity Admin must always be provided. Check the Default Credentials File for details.
-
If necessary, create the Java-based Server configuration file (see Java-based Service step).
For a Silent Unconfiguration:
-
Run Deployment Tool or Configuration Wizard with the unconfigure command.