Other Installation Configurations
This chapter provides information about other installation configurations:
Distributed Installation
DirX Identity components can be distributed across different machines.
If DirX Identity is installed in a distributed environment, ensure all machines are updated to the same software version to avoid severe interworking issues.
You can verify the installed version on each machine by checking the install_history.txt file in the installation directory.
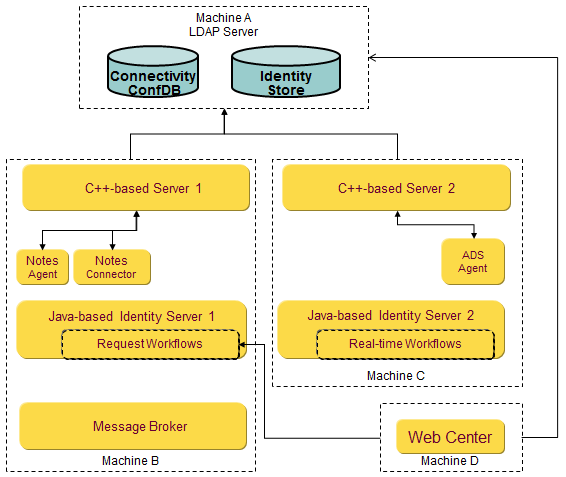
Example Distributed Setup
-
Machine A:
-
DirX Directory with Connectivity configuration
-
Identity Store (users)
-
-
Machine B:
-
Message Broker for all DirX Identity components
-
C++-based Identity Server 1 (hosts Notes connector and Notes agent)
-
Java-based Identity Server 1 (handles request workflows)
-
-
Machine C:
-
C++-based Identity Server 2 (controls Active Directory agent)
-
Java-based Identity Server 2 (runs real-time workflows for provisioning and password synchronization)
-
-
Machine D:
-
Web Center
-
License Requirements
-
Business Suite
-
Professional Suite (required for request workflows)
-
Connectivity packages for Active Directory and Lotus Notes
Installation Steps
-
Machine A – Install Connectivity Configuration:
-
Follow steps in:
-
"Hints for Installing the Directory Server"
-
"Configuring Connectivity Schema and Data"
-
"Configuring Provisioning Schema and Data"
-
-
-
Machine B – Install Message Broker, Servers, Manager, and Notes connectivity:
-
Run installation (see Installing DirX Identity)
-
In Choose Install Set dialog, select:
-
Message Broker
-
C++-based Server
-
Java-based Server
-
Manager
-
IBM Connectivity Package
-
-
-
Machine C – Install additional Servers, Manager, and Microsoft connectivity:
-
Run installation (see Installing DirX Identity)
-
In Choose Install Set dialog, select:
-
C++-based Server
-
Java-based Server
-
Manager
-
Microsoft Connectivity Package
-
-
-
Machine D – Install Web Center:
-
Follow steps in DirX Identity Web Center
-
The configuration procedure writes details about installed servers and connectivity packages into the DirX Identity Connectivity configuration.
Password Management including specialized Web Center
This section explains how to install the password management feature described in Use Case Description Password Management.
| License required: Password Management for installing Web Center for Password Management. |
Installation Steps (Single Machine)
-
Install a directory server using native tools.
-
Install Tomcat:
-
Select NT Service on Windows platforms
-
Check release notes for supported Tomcat versions and Java environment
-
-
Run DirX Identity installation (see Installing DirX Identity):
-
In Choose Licensed Features Set dialog, select at least Password Management
-
In Choose Install Set dialog, select components as per “Installation” in Use Case Description Password Management
-
Include Web Center for Password Management Configuration
-
-
Run DirX Identity configuration (see Configuring DirX Identity):
-
In Configuration Options dialog, select steps as per “Configuration” in Use Case Description Password Management
-
Complete all configuration dialogs
-
For details, refer to Use Case Description Password Management.
Configurations using DirX Identity High Availability Features
Setting up High Availability configurations requires understanding Use Case Description High Availability. Before starting, ensure you have the following licenses:
-
Business Suite
-
High Availability
-
Connectivity packages for all systems you plan to deploy
Planning Considerations
A robust High Availability setup should include:
-
Multiple C++-based Servers
-
Multiple Java-based Servers per provisioning domain (deploy these servers across multiple hosts for redundancy)
-
Identical connectivity packages installed on each host
-
Two Message Brokers on different machines with a shared message repository
-
Shared folders for:
-
Message repository
-
Each Java-based Server repository
-
Any additional components required for productive use
Installation and Configuration Steps
-
Install DirX Identity on each relevant host (see Installing DirX Identity):
-
In the Choose Licensed Features Set dialog:
-
Select all licensed features (must be identical across all hosts)
-
Consistency is critical because this information is stored in multiple locations and must match across the distributed configuration
-
-
In the Choose Install Set dialog:
-
Select components according to the section “Configuration” in Use Case Description High Availability
-
-
-
Configure DirX Identity on each relevant host (see Configuring DirX Identity):
-
In the Configuration Options dialog:
-
Select components as described in the “Configuration” section of Use Case Description High Availability
-
-
-
Perform additional configuration steps:
-
Follow the instructions in “Configuration” in Use Case Description High Availability to implement your High Availability scenario
-
Ensure shared resources (message repository and Java-based Server repositories) are properly configured and accessible across hosts
-
Validate connectivity packages and Message Broker setup for redundancy
-