Introduction

DirX Identity provides the following installation procedures to build up a DirX Identity environment:

  • An installation procedure simply copies the necessary files to the file system and updates registry entries (on Windows) and environment variables (which requires a restart on Windows). The installation procedure can handle either local or distributed DirX Identity systems.

  • A subsequent configuration procedure extends the schema of the directory server for DirX Identity, loads the DirX Identity domains with initial data and configures all other components of DirX Identity. The configuration procedure is tailored to configure either local or distributed DirX Identity systems. (See section "Schema and Content Handling" in chapter "Additional Topics" for details.)

Installation and configuration is clearly separated. Select all components that are necessary on a specific machine. Afterwards you can configure these components with the DirX Identity Configurator.

The remainder of this chapter provides general information about the installation and configuration procedures. This chapter does not discuss installation in a distributed environment.

Please note that new versions of DirX Identity are distributed about every half year. To allow intermediate updates (new features or bug fixes), service packs are delivered.

For example, Service packs can be used to:

  • Enhance the DirX Identity Manager with new functionality.

  • Extend the Connectivity or Provisioning Configuration with new default applications.

  • Deliver new or updated agents or connectors.

  • Extend or correct the documentation / help.

  • Correct known bugs with high importance.

Contact your support organization for the latest information about service packs.

General Information

This section provides information that applies to all DirX Identity installation procedures.
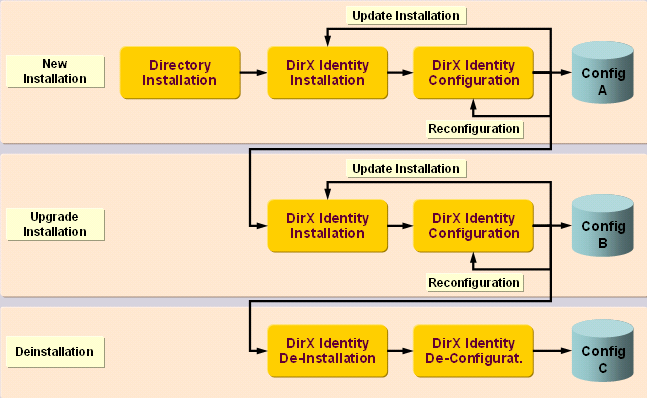
Supported Use Cases

Only the following use cases are supported:

Supported Use Cases

New Installation

Installing DirX Identity for the first time requires installation of one of the supported directory servers (Directory Installation). Afterwards, the DirX Identity Installation is to be performed. It installs all necessary software. Running the DirX Identity Configuration imports and configures all necessary data into the LDAP configuration stores (Config A).

You can extend or change the configuration at any time (Reconfiguration).

Update Installation

Running an Update Installation is also possible if you destroyed parts of the default objects in the configuration stores.

Before running an Update Installation, check the section "Preserving Files" in the chapter "Preparing the Migration" of the DirX Identity Migration Guide for files to be preserved and create backup copies of these files.

Running the DirX Identity Configuration imports and configures all necessary data into the LDAP configuration stores (Config A).

After running an Update Installation with Configuration, check the section "Restoring Preserved Files" in the chapter "Manual Migration" of the DirX Identity Migration Guide for files to be restored and restore these files according to said section.

You can extend or change the configuration at any time (Reconfiguration).

Upgrade Installation

Installing a new version of DirX Identity requires an Upgrade Installation. Run the DirX Identity Installation of the new version and then perform a DirX Identity Configuration. The DirX Identity Configuration performs automatic migration and configures all necessary new data. Check the DirX Identity Migration Guide for manual steps to be performed.

You can extend or change the configuration at any time (Reconfiguration).

De-Installation

If you intend to un-install DirX Identity, run the DirX Identity De-Installation. This includes the DirX Identity De-Configuration routine. After these two steps all installed software is removed from the machine.

Because you may want to use all or part of the LDAP configuration stores, this data is not touched and is therefore preserved.

Note that it is not possible to run a new installation on such a configuration store. Perform a new installation (see above) on an empty configuration store of the new DirX Identity version instead and then migrate the data from your old configuration store using the corresponding directory server tools.

Supported Meta Directories

You can run the DirX Identity installation on the following LDAP directory servers:

  • DirX Directory Server

See the release notes for the supported version numbers of these directory products.

Supported Operating Systems

You can run the DirX Identity installation on the following operating systems:

  • Microsoft Windows

  • Linux

See the release notes for the supported version numbers, prerequisites, and limitations of these operating systems.

The next sections provide specific hints and procedures for the related operating system.

Compatibility with Previous Releases

You can upgrade from previous versions of DirX Identity. See the corresponding guidelines in the DirX Identity Migration Guide.

Disk Space Requirements

The installation requires temporarily 1400 MB of disk space. The complete DirX Identity installation requires 980 MB of disk space. For data and log files, additional space is required.

See the section "Disk Space Calculation" in the chapter "Additional Topics" for more information.

Hints for Firewall Configuration

The default ports you should open for firewalls are (only if you use the corresponding component):

Service Non SSL SSL

Apache ActiveMQ broker

61616

61617

Apache ActiveMQ admin Web console

8161

8161

Apache ActiveMQ (JMX)

10098+10099

10098+10099

C++-based Server (SPML Service)

9900

9901

C++-based Server (proprietary JMX)

5315

5315

Java-based Server (HTTP/HTTPS Web services)

40n00

40n00

Java-based Server (JMX)

40n05+40n06

40n05+40n06

Tomcat deployments (defaults)

8080

8443

These ports are the default ports that you can change during the DirX Identity configuration. If you change them, open these ports in your firewalls. For the IdS-J server, the n is set to 0 for S1, 1 for S2, and so on.

Check the ports of the LDAP server(s) you intend to use as the Connectivity Store and/or Provisioning Store, respectively. Open these ports on the server-side if your scenario requires remote access to these LDAP servers(s). For DirX Directory Servers, the defaults are 389 (Non SSL) or 636 (SSL), but the ports that are actually relevant depend on the LDAP configuration.

If you are running DirX Directory Server 9.0 or later on the same host as the tomcat for DirX Identity, make sure, that the secure port used for the DirX Directory REST service (default 8443) is different from the secure port (default 8443) used for the tomcat installed for DirX Identity. The port 8443 will be configured in the configuration file of the DirX Identity Business User Interface for accessing the DirX Identity REST service.

Note that two ports are now used for JMX Access. In the configuration, you set the first number in the configuration; the second is always the first port number +1 and is the JMX RMI port.

Check for additional ports for connectors and agents necessary to access target systems you intend to provision (see the service definition for the corresponding connected directories).

The C++-based Server uses the default port 1111 for the transfer of private keys from the server to an agent. This is local process intercommunication so do not open this port in your firewall.

If you defined other ports during DirX Identity configuration, adapt your firewall configuration accordingly.

Note: With a socket connection, an “ephemeral” (short-lived) port is used on the client side, which the client requests from the operating system. In Microsoft Windows, the range of these ports is usually between 49.152 and 65.536. If a port is in use, change the port number during configuration accordingly.

Installation Limitations

The installation and configuration procedures have the following general limitations:

  1. You must run the installation procedure on the machine that is the installation target (remote installation is currently unavailable).

  2. If DirX Identity is installed in a distributed environment, be sure to update all machines with the new software version. Otherwise, severe interworking problems could be the result. You can check the installed version on a machine in the install_history.txt file in the installation directory.

  3. Before performing an update or an upgrade installation, you need to perform these steps:

    • Stop all running workflows (disable scheduling, shutdown event managers). You can use the maintenance scripts to perform this task.

    • Stop all DirX Identity services and user interface components, including the Tomcat Services into which you deployed DirX Identity components.

Deploying Web Services

DirX Identity provides several Web Services which can be deployed into an Apache Tomcat Web container. The Tomcat Web container can be a separate, stand-alone Web container or the container embedded into the IdS-J server (embedded Tomcat). The IdS-J server contains a built-in (embedded) Tomcat service with default port 40.000.

Note that when you deploy them into the IdS-J server container, they are started and stopped together with the server. The operation of an external Tomcat web server as a service is out of scope of this manual.

Determining the Account for Configuration on Linux Platforms

The appropriate permissions are required to perform the configuration of your DirX Identity installation on Linux platforms. Superuser permissions are always sufficient.

However, if you intend to run configuration tasks as the DirX Identity installation account, you must ensure that the following conditions are satisfied:

  • Conditions regarding the Tomcat installation. If you are going to deploy DirX Identity Web Applications, you must ensure that the DirX Identity installation account has read, write and execute access to the Tomcat installation directory and that these subdirectories of the Tomcat installation are present:

  • conf/Catalina/localhost

  • work/Catalina/localhost

You can satisfy these requirements by:

  • Logging in as the DirX Identity installation account and then installing Tomcat into a subdirectory of the DirX Identity installation account; or:

  • Installing Tomcat using some other account or as superuser and then changing the permissions for the directories listed above. The permissions must be 775 if there is a Linux group of which both the Tomcat account and the DirX Identity installation account are members. Otherwise, the permissions must be 777.

  • Conditions regarding the LDAP directory installation:

  • Superuser permissions are always required for configuration tasks.

  • The home directory of the DirX installation must be readable and executable for group members.

  • A Linux group must be defined so that both the DirX installation account and the DirX Identity installation account are members of this group.

Accounts for Tomcat and DirX Identity Installations (Linux Platforms Only)

If you are going to deploy DirX Identity Web Applications, you must ensure that the Tomcat installation account has read and write access to the password.properties files of the related Web Applications (for example, Web Center). Options for completing this task are:

  • Install Tomcat as superuser.

  • Define a Linux group so that both the Tomcat installation account and the DirX Identity installation account are members of this group.

  • Log in as the DirX Identity installation account and then install Tomcat into a subdirectory of the DirX Identity installation account.